Monthly Archives

April 2014

Book Reviews Japanese Sewing Books in English Ladies Sewing Patterns

Book Review – Stylish Skirts (in English)

April 28, 2014

Another Japanese sewing book that has been translated to English, Yay! Adding that to the growing list 🙂

This is another translated book by Sato Watanabe, the other being I Am Cute Dresses: 25 Simple Designs to Sew.  There’s another one coming soon sometime in July – Basic Black: 26 Edgy Essentials for the Modern Wardrobe. I hope I will be able to get hold of that before it’s release. But first, back to Stylish Skirts.

stylishskirts1

There are 23 skirts to make. Let’s see what type of skirts you can learn to make from this book.

stylishskirts2

A – Embroidered skirt with gathered waist and lace hem.

It looks like a very simple skirt, but this has a proper waistband with a side zipper construction. Ideal for those of you looking to progress beyond drawstring or elastic waistband skirts.

stylishskirts5

You can’t quite see it from the picture but this A-line skirt is made up of 12 panels! The overall shape is still a simple A-line shape but I think the multiple seam lines give it more structure. This skirt uses a invisible size zipper enclosure.

stylishskirts9

A wrap style panel skirt with an asymmetrical front panel.

stylishskirts11

Skirt with Lace trimmed Irregular Hem. There are darts in the yoke for a snug fit on the hips.

stylishskirts12

Now for some pleated skirts. At first glance this looks like a simple box pleat skirt.

stylishskirts13

Until you look closely between the pleats. Notice the vertical striped pattern hidden within the pleats, in contrast to the horizontal pleats on the front of the skirt panels. I love the beautiful top stitching detail around the pleat lines too, it gives the skirt a professional touch!

stylishskirts15

I thought this was a simple tiered gathered skirt at first, then I realized the gathers were located in alternate sections for the different tiers.

stylishskirts16

A wrap skirt with a frilled edge.

stylishskirts17

Very interesting looking skirt made with irregular shaped frills.

stylishskirts18

Finally a balloon skirt for adults! This comes in long and short versions. I personally find the long version a bit much, but the short version looks a lot cuter and more wearable.

stylishskirts19

Another very sweet skirt – Skirt with shirred yoke and lace belt.

stylishskirts25

Close up on the shirring details on the yoke.

stylishskirts20

For those of you who have a more adventurous fashion sense 😛 Here’s an avant garde skirt you can make.

stylishskirts22

18 panels this time! The colors are nice but some how this reminds me of a circus tent. A little too stiff and structured looking for me.

stylishskirts23

8 Button skirt. I can imagine this in a shorter and cuter summer version, i.e. without the extra stripe sections.

stylishskirts24

A functional skirt with large cargo pockets.

Now for the more technical details…

1. There are no patterns included, because these skirts are all made up of simple rectangles or trapezoids.  Drafting diagrams are given for each project so you will need to draft your own patterns (see example below)
2. There are no size charts, because the drafting dimensions are derived by using your exact body measurement. Which means that you can custom the skirts to fit you perfectly!

stylishskirts8

A project how-to-make consists of the following – Cutting Layout,

stylishskirts6

Drafting Diagram. Main units are in inches, while those in brackets are in centimetres.

Update : There has been some confusion over the construction of these diagrams. So I emailed the publishers to clarify matters. Basically the Width (W) and Hip (H) measurements are taken based on your individual measurements, then depending on the number of panels needed to construct the skirt, you have to divide this measurement accordingly.  In the example above (from Skirt V on page 88), the correct dimension for the panel should be
W = Waist measurement divided by 18
H = Hip measurement divided by 18
(effectively ignoring the number 7) 

For the question raised in the comments below – skirt L – Trapezoid Skirt with Line Detail, the drafting dimensions should be 
W = Waist measurement divided by 16
H = Hip measurement divided by 16
(ignore the number 6 3/8)

If any of you have questions with the other patterns, do post them below and I will post the correct drafting measurements below.

stylishskirts10

Sewing Steps

stylishskirts7

Close up of the sewing steps.

stylishskirts21

Included in the book are also tips on for sewing better skirts (addressing fit and ease depending on your desired comfort level), notes on skirt linings, glossary of sewing terms etc.

stylishskirts26

Available now on Amazon.com

Title : Stylish Skirts: 23 Simple Designs to Flatter Every Figure
Author : Sato Watanabe
ISBN : 978-4805313077

Sew-along Sewing Tutorials Sewing Videos

April Sew Along – Pattern A1 and A2 from Feminine Wardrobe – Part 2 of 2

April 24, 2014

And here is Part 2 of this month’s sew-along. Click here for Part 1  if you need to refer to it.

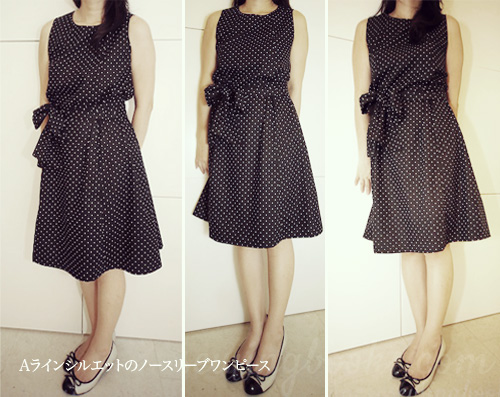
Just a quick note about the finishing of the hem (Step 7). Before you finish the hem, try on the dress first and see if you like the length. I found it too long (below the knee for me because I’m short), so I chopped a couple of inches off so that it was slightly above the knee. The book also called for blind stitching for the hem of the dress (A1), and a double fold hem for the tunic (A2). In any case, I would have used the machine for both patterns because I did not really like the idea of hand stitching all the way around. Anyway, my fabric was black so it was hardly noticeable.

I only finished the dress today so I couldn’t get a chance to take any proper pics before it got too dark. My 9 year old took these for me! Tip : if you have short legs like me, get a child to take your photos, her photos were taken from a lower perspective which made my legs look much longer ;P

I will try to take more photos tomorrow morning when there is more light, using other belts (which was my original intention) and also to see what it would look like in the giant bow-tie tunic (Pattern A2) style.

Alinesleevelessdress

For those of you who don’t have this book but would like to get the pattern and sew along later on, here’s the link to buy the book from Amazon.

Happy Sewing! And let me know if you have any questions by leaving your comments below.

Sew-along Sewing Tutorials Sewing Videos

April Sew Along – Pattern A1 and A2 from Feminine Wardrobe – Part 1 of 2

April 21, 2014

This month’s sew-along, as decided by your votes, is this Sleeveless Dress with Bow Sash from the book Feminine Wardrobe (translated to English).  Those of you who took part in the poll early this month will know that it was a very close fight between this and a the Button up blouse from Stylish Dress Book. But there has to be a winner, so this is what we will sew today!

aprsewalong (2)

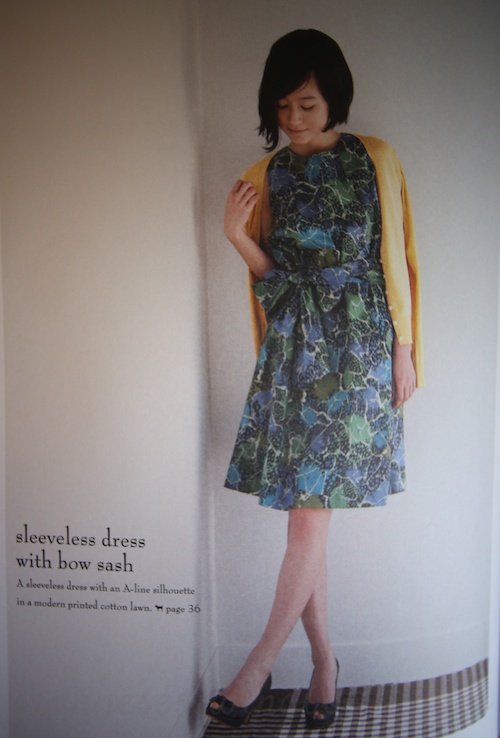
The dress we are sewing is Pattern A1 of Feminine Wardrobe. The good news is that there are 3 variations of this pattern A.
Pattern A1 – Sleeveless dress with bow sash
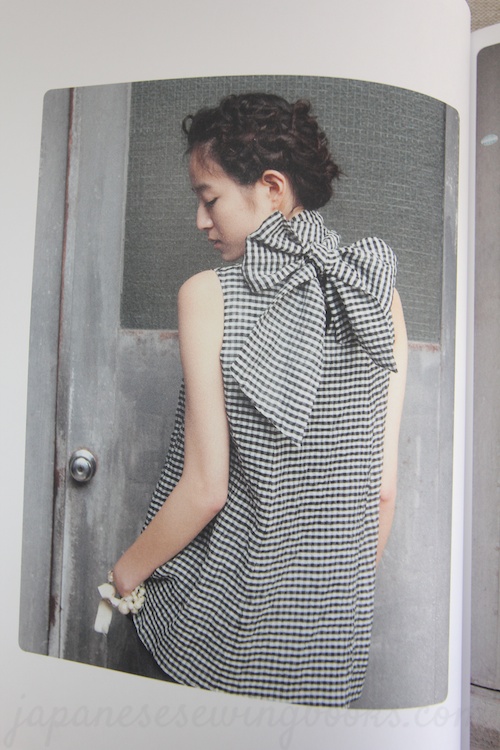
Pattern A2 – Giant Bow-Tie Tunic (see pics below)
Pattern A3 – Ruffle Shoulder Dress

femininewardrobe 13

femininewardrobe 12

Patterns A1 and A2 are long and short versions of the same pattern, whereas A3 incorporates ruffles into the vertical seams. The steps for A1 and A2 are identical, and for A3 the only slight variation in steps are the insertion of the ruffles. So basically this one sewing video tutorial can help all those of you who are sewing one of these 3 patterns.

To kick off the sew-along, here are the list of materials you would need

Pattern A1
XS/S sizes – 1.1m wide x 3.5m long.
M/L sizes – 1.1m wide x 3.7m long.

I only purchased 3m, as I decided I was going to make the ribbon in another fabric, or even do without the ribbon and use a belt instead. I am only 3/4 of my way through making the dress so there are no completed photos of it yet. I will post photos when I’m done.

For Pattern A2 you will need less fabric since it is shorter –
XS/S – 1.08m x 2.6m
M/L – 1.08m x 2.7m

(The difference in fabric width is due to the type of fabric used. Pattern A2 used a silk seersucker in the book, while A1 used a printed cotton lawn)

The sew-along videos will be posted in 2 separate parts.

Today 21st April – Part 1 – Steps 1-4
Thursday 24th April – Part 2 – Steps 5-9

Here’s the video for today. Do watch out for Part 2 that will be posted this Thursday.

For those of you who don’t have this book but would like to get the pattern and sew along later on, here’s the link to buy the book from Amazon.


Happy Sewing! And let me know if you have any questions by leaving your comments below.

Book Reviews Japanese Sewing Magazines Ladies Sewing Patterns

Magazine review – Sewing Pochee Spring 2014

April 15, 2014

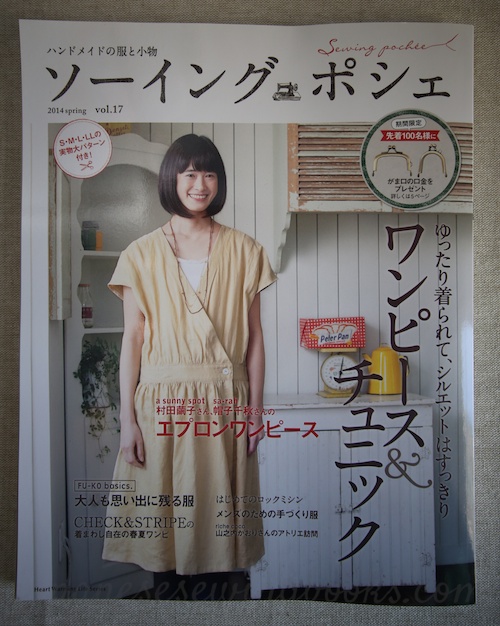
It’s time for Spring sewing! With Sewing Pochee magazine vol.17.

pocheespring2014_1

Main feature of this issue – Dresses and Tunics. Other than sewing for adults, there are also sewing for accessories like bags, wallets, hair accessories, as well as some kids patterns. Let’s take a look!

pocheespring2014_2

Zakka craft feature – Metal frame purses patterns and a 2 page sewing lesson with full color step-by-step photographs.

pocheespring2014_3

Apron dresses for everyday wear

pocheespring2014_4

pocheespring2014_5

Love the use of leather straps on this one!

Tunic dresses – there were lots of tunic dresses, about 12 patterns in all, so I am only picking out my favourites to show you.

pocheespring2014_6

Gathered tiered tunic

pocheespring2014_7

pocheespring2014_8

I’m not really a fan of the fabric used on this but I like the pleats and ribbon tie, plus there is a 4 page detailed sewing lesson for this particular tunic.

pocheespring2014_9

pocheespring2014_10

Interspersed between the projects  are interesting little features like this one about the sewing machines used by famous sewing bloggers/authors of sewing books. Recognize any of them?

pocheespring2014_11

A peek into the behind the scenes at Check & Stripe Fabrics.

pocheespring2014_12

More sewing projects : Bags and wallets for Springtime!

pocheespring2014_13

Remember the book review on Fuko Basics I did last week? I know many of you are in love with that book and the designs. There are adult versions for 2 of the projects made in that book.

pocheespring2014_15

The white pleated blouse,

pocheespring2014_16

and the relax dress that I love so much! I need to buy a whole lot of knit fabric to make 3 of these for me and my girls 🙂

pocheespring2014_17

and look, there’s a Men’s Polo Shirt pattern as well! Unfortunately there is only one size – Free Size.
According to the pattern instructions, the finished dimensions of the shirt are
Chest – 102cm, Length – 68cm.

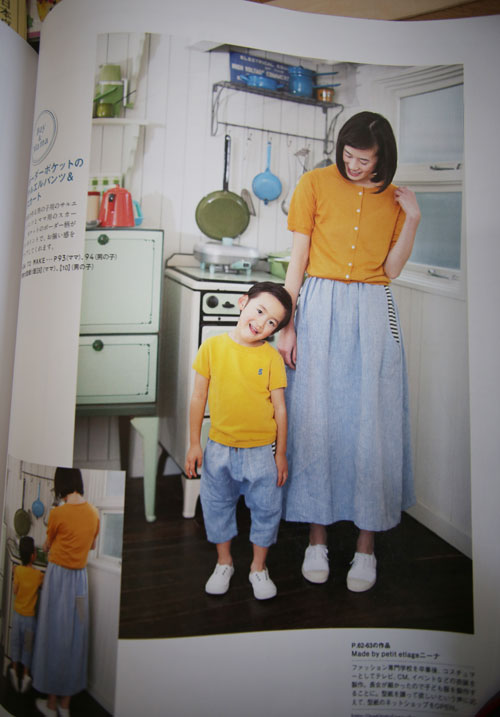
Next up – matching outfits for Mum and Kids.

pocheespring2014_19

pocheespring2014_31

pocheespring2014_22

Matching tiered gathered dress designed by NANATONE

pocheespring2014_20

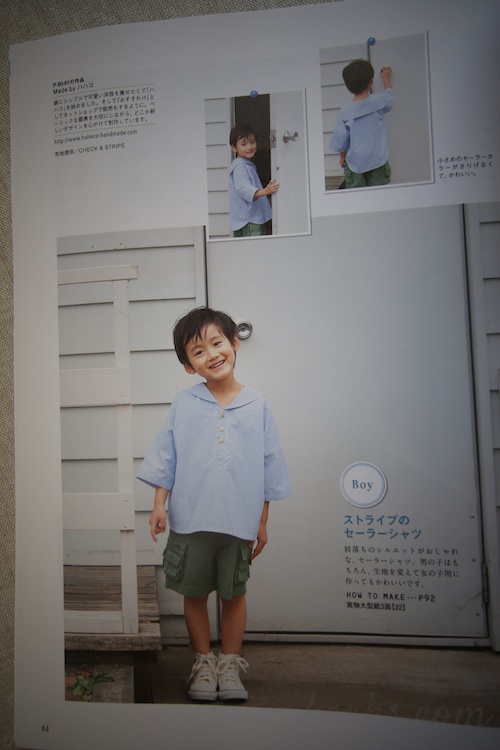
There are also some cute outfits for kids, like this little sailor shirt for boys (by hahaco of www.hahaco-handmade.com)

pocheespring2014_21

Gathered Culottes by petit etalage

Here are the size charts for the projects included. All units are in cm.

pocheespring2014_26

The table on the top is for Adult (Ladies),  Leftmost column – Bust/Waist/Hip/Height (based on 160cm for all sizes)
The table below is for Kids,  Leftmost column – Height/Bust/Waist/Hip

Other than the detailed sewing lessons, the rest of the project instructions look like this. Not full color, but the shading helps in identifying right and wrong sides of the fabric.

pocheespring2014_28

pocheespring2014_29

A closer look at the diagrams

pocheespring2014_27

2 large actual size pattern sheets attached.

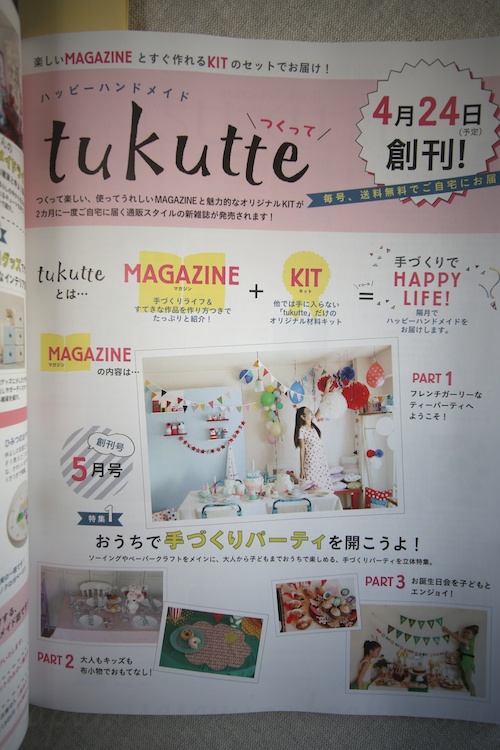
PLUS, an exciting announcement for a new craft magazine called tukutte that will be out in April!  The magazine is published every two months and the most exciting thing about it is that every issue inclues a handicraft kit.

pocheespring2014_24

The list of free kits lined up for next year is already listed!

pocheespring2014_25

Can’t wait to get my hands on it. I sure hope they don’t leave the kit out for overseas shipping.

pocheespring2014_30

 Title : Sewing Pochee Spring 2014
ISBN : 978-4-529-05316-7
Publisher : Nihon-Vogue


Translations and Help with Patterns

Translation Request – C zip

April 11, 2014

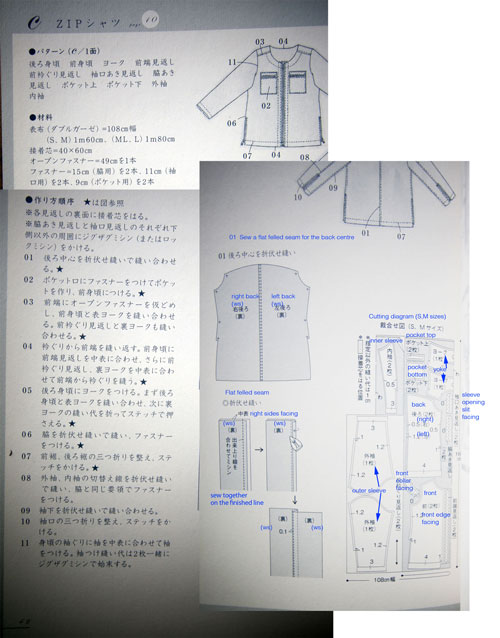
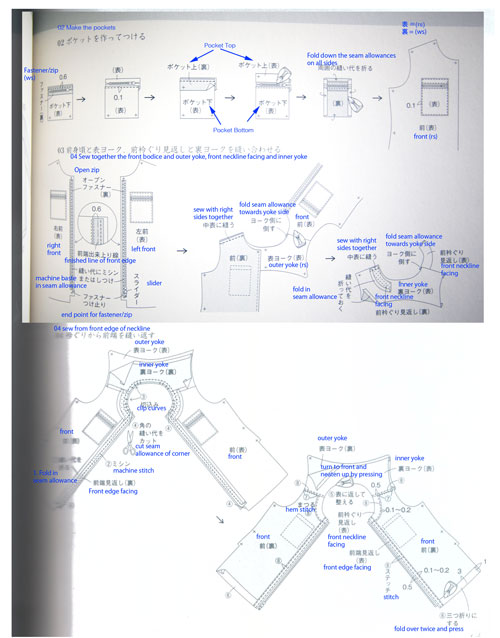
Today’s translation request is for Sheri, who needed to make this jacket for a wedding later this month.

The pattern is from this book which I reviewed two years ago

pg1_sm pg2_sm pg3_sm


Patterns (C/ 1 side)
Back bodice, Front bodice, Yoke, Front edge facing
Front neckline facing, Sleeve slit facing, side slit facing
Pocket top, pocket bottom, outer sleeve,
inner sleeve

Materials (double gauze) = 108cm wide

Interfacing
Open fastener (zip) 49cm x 1 pc
Fastener (for sides) 2pcs, 11cm (for sleeve opening) 2pc
9cm (for pockets) 2pcs

Order of make (star symbol means to refer to diagram)
*Attach interfacing to the wrong sides of all facing pieces
*Overlock/zig-zag stitch the outer edge of the side slit facing
and sleeve slit facing.

01 Sew the 2 back pieces together with a flat-felled seam

02 Attach zips to pocket openings, make pockets and attach to
front bodice

03 Tack the zips to the front edges of the front bodice, sew front bodice pieces with
yoke outer piece (right sides together). Sew front neckline facing piece to yoke inner piece.

04 Align and place the front edge facing pieces to the front edges of the bodice,
then the neckline + back inner yoke pieces over the front bodice neckline + back yoke
outer piece, all right sides facing. Sew all around from the front bodice edge, to the neckline,
then to the other front bodice edge.

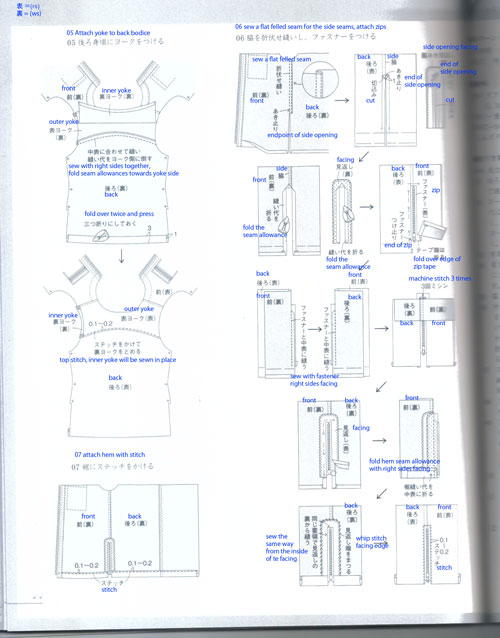
05 Attach the back bodice to the yoke. First sew the back bodice and outer yoke together,
then fold the seam allowance of the inner yoke inwards and stitch in place.

06 Sew the side seams with a flat-felled seam, attach fasteners

07 Finish the front and back hems with a double fold hem. Stitch in place.

08 Align the outer and inner sleeves along the seam lines and sew with a flat felled seam,
attach fasteners similar to the side seam.

09 Sew the underarm seams with a flat felled seam.

10 Finish the sleeve opening with a double fold hem, and stitch in place.

11 Align the armhole with the sleeves, right sides together and sew. Overlock/serge both
layers of seam allowances together to finish the edge.

Happy sewing Sheri! 🙂