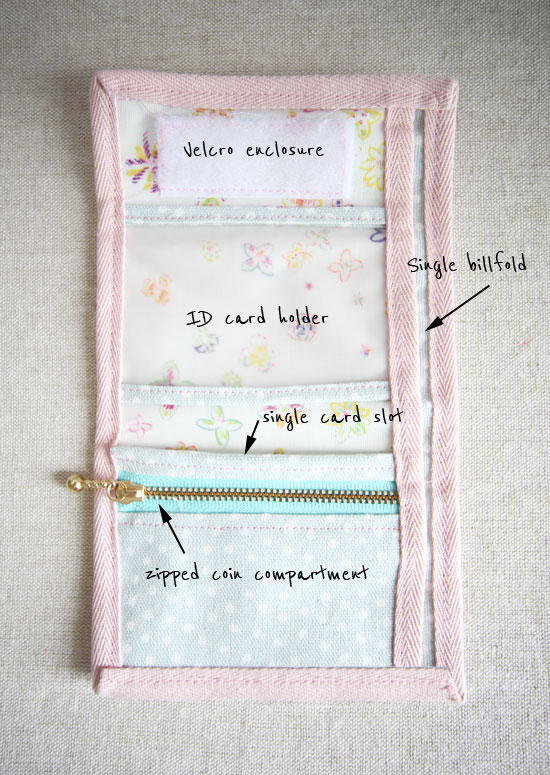
This month’s sew-along, or rather, sewing tutorial, is a simple wallet that I made for my girl to carry to school. As she is only in primary school, she only needs to carry some loose change, a couple of bills occasionally, as well as a single student ID card. So this is a very simple, minimalistic wallet, which I thought will be great for traveling as well. There is one zipped coin compartment, one ID card holder, as well as an additional card slot (behind the coin compartment). Both card slots are sized to fit a standard credit card size, but in actual fact there’s enough room for a few cards in both slots.

I am using naniIRO’s Field STAR Hooray_やっほー laminated cotton. Isn’t it lovely? I bought it last June during my trip to the nani IRO atelier. I wasn’t looking for laminates in particular but there it was, standing against the wall in the corner, calling out my name ;P I have been keeping it aside to make a bag of my own, but since it was so precious I was always afraid of sewing with it and possibly ruining it! This is a small little project which only requires a little bit of fabric so I mustered up the courage to cut! and I’m so glad I did. 🙂
It is really a very simple wallet and quick to sew, so there will only be two posts on this sew-along. Today is all about the materials, and I will post the pattern, or rather, the layout diagram, sewing video and how-to-make on Wednesday. This is so that you can have some time to get your materials ready. Please read my notes below with regards to the materials. Making a wallet usually requires interfacing but due to my choices of fabric I did not have to use any. So do prepare some medium/heavy weight interfacing to give your wallet some structure if you are using light/medium weight fabrics.
Materials


About the materials
Outer fabric
I am using laminated cotton fabric, which is great because it can stand up to dirt and stains. It is also quite stiff and sturdy thanks to the laminated layer. If you are using normal cotton fabric, you can use normal fabric reinforced with medium-heavy weight fusible interfacing. There are also iron on vinyls like those from Heat ‘n’ Bond if you have a favorite print you want to use that does not come in laminate options.
Billfold lining
I used an upholstery weight fabric (for cushions and curtains) for this, so I didn’t need to add interfacing. If your fabric is light weight or medium weight it will be a good idea to reinforce this layer with interfacing.
Plastic Sheet
The plastic sheet was actually salvaged from the plastic cover of an old diary. It is slightly frosted which is great because I find that glossy plastic tends to be sticky and sometimes printed cards will get stuck and leave marks on the plastic piece as well. Look around you for something you can recycle, like an old clear plastic file or old book covers. You can even use vinyl sheets (available in some fabric stores), although I must say that cards tend to stick to vinyl.
Cotton Twill Tape
These tapes come in both polyester and cotton options. Both are fine, but try to get one that is not so thick. I found mine a little too thick for my machine to handle, especially around the folds and overlapping bits, I had to manually maneuver my stitches over the thick areas.
Zip
In the list of materials I mentioned a 12cm zip. I chose a metal zip that was slightly longer because the metal zip stoppers on both ends would have made it difficult for me to sew the twill tape over. So I chose to use a slightly longer zip and cut off the excess.
Ok, time to go shopping for your materials! If you have them ready, move on to the next post for the tutorial – Simple wallet sewing video tutorial with free pattern – Sew-along Day #2

8 Comments
Ahhhh…. I’m so excited to follow along .. I also didn’t know Nani iro did laminates! Can I ask where it is for sale online, please? Xx
I bought this piece in Japan, maybe you can try emailing Etsy stores selling nani IRO fabric, especially those who ship from Japan (like Miss Matatabi), if they are able to source it for you?
How exciting I cant wait to start.
I even have a plastic covered piece of fabric. Thanks
Oh, this is just too cute! I can’t wait to start! My local JoAnn doesn’t carry any laminated fabrics as cute as yours, but I can probably find something simple that would match the overall theme. Thanks for doing this sew-along!
Hi! Where do you get your cute zippers? I can’t seem to find them anywhere in the US.
Hi Michele, my zips are either bought in Japan or from shops in Singapore, but the ball chain metal zipper is from YKK, you might be able to find them on Etsy or eBay?
Hi nice simple wallet tutorial I would like to make this soon; not sure when though but hopefully; can’t wait till u get the tutorial out if it’s not out yet & if it’s out already Where Can I Find This Wallet Tutorial; Thanks In Advance For Your Help & I Look Forward To Your Response A.S.A.P & TAFS.
NB: If Or When I Make This Peoject How Can I Send You a Pics Of The Finish Product;Just Asking; Thanks.
[…] and dirt off the surface. I have some laminated nani IRO fabric in my stash that I used for a wallet tutorial a few years […]