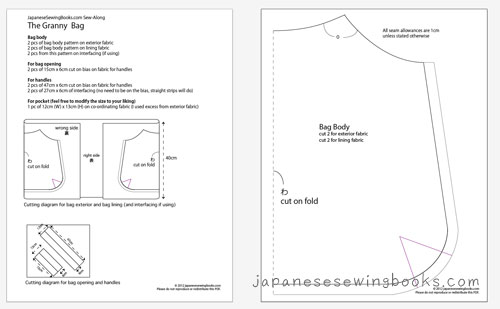
It’s the first day of our sew-along! Before we begin, I just wanted to go into some details on interfacing and fabric cutting. Those of you who have already made bags and are expert sewers, please bear with me or just skip this section and jump ahead to the pattern! 🙂
Interfacing
Interfacing is something like a thin piece of fabric that is added on to make a fabric more rigid. Certain bags that need more structure require it, and some bag makers insist you have to use it everytime, but in this case, I would say that it depends on your personal preference as well as your choice of fabric.
The first bag I made was using linen for both the exterior as well as the lining, and I did not use interfacing for the bag body because linen has a bit of body to it, not to say that the bag can stand up on its own, but it does not flop around as much compared to two layers of medium weight cotton.
For the bag I am making for the sew-along, I used a thicker exterior fabric (something like twill) but the interior was a quilting cotton which was quite thin. So I added interfacing to it. But because the exterior was thick enough, after adding it on it felt a little too rigid for my liking, so I would say it’s really up to you, if you are using thick fabrics like canvas or twill for at least one of the layers, you can safely omit interfacing. The only time I think you must use is if both layers are made of medium weight fabrics.
Fabric cutting
If you are using prints, take note of the the orientation of the graphics and alignment when you are cutting the pieces out. In the cutting diagram I placed the bag body side by side to cut out, in order to save fabric, but if you want a particular graphic to be in the centre of the bag, then just move the pattern piece accordingly. Also, if you are particular about certain elements aligning at the side seams (especially for stripe fabrics or geometric prints), then you may need more precision and maybe more fabric when cutting the front and back pieces just to ensure the sides match up well.
Ok! Let’s start shall we?
1. Download the PDF pattern below and print it out.
2. Cut out the bag body template and lay it on the fold of the fabric. After cutting one out, fold cloth over again and cut the second piece.
3. Repeat for lining fabric, and interfacing if you are using.
4. Cut out pocket from exterior or lining (or other co-ordinating fabric). The size of the pocket is up to you. The dimensions I have included are to fit an iphone. But if you wish to make a larger pocket, just adjust the size accordingly, but add 2cm to the width (for 1cm seam allowance on both sides) and 3cm to the height (2cm for the top and 1cm below)
5. Here are the pieces you should have – 2 pcs each of exterior and lining, 1 pocket.
6. Following the cutting diagram, cut 2 short pieces of handle fabric 15cm x 6 cm on the bias (meaning diagonally) that will be used to cover the top curved opening of the bag.
7. Cut 2 longer strips 47cm x 6cm each for the handles.
8. Cut 2 strips of interfacing (no need to be on the bias) 27cm x 6cm. (In the diagram the interfacing is placed on top of the long strips, right in the middle)
9. Taking the first bag body piece, line up the pattern on the right side of the bag and mark the darts on the fabric.
Repeat for the left side and then make the same marks on the other piece.
10. If you are not using interfacing, move on and make the same marks on the lining fabric. If you are using interfacing, iron on the interfacing to the wrong side of the fabric first, then make the marks on the interfacing.
11. Remember to put a piece of fabric (not too thick) in between the iron and the interfacing or it will melt and warp and even get stuck on your iron. Guess how I fount that out ? 😉
12. At this point you should have all your bag body pieces ready, marked and ready for sewing.
13. Now we have to prepare the pocket piece. First we need to fold over and sew down the top edge twice (to hide away the raw edges). The “sewing 0.2cm from the edge” is what the books like to tell us to do, but in real life, I just go as neat and near the edge as I can manage 🙂 I don’t really measure or or obsess about it.
14. Now turn it around and do this. You can just crease it with your finger instead of ironing.
15. On the right side of the lining fabric pin the pocket where you want to place it. The diagram shows the measurements I used, you can follow it or adjust it to your liking.
16. Now sew on the pocket. Note the top two corners should be reinforced by sewing a triangle in the corner. This will strengthen the corners and prevent your pocket from tearing out easily.
17. If you want to sew on any other labels or embroidery to any part of the bag, be it exterior or interior, this is the time to do that! I added a handmade label on the other lining piece. For my first bag I added a label onto the front. Get all the labels on because we are going to get ready to sew the bag together.
But, that will be for day 2! See you tomorrow 🙂
Questions? Comments? Spot any errors? Let me know!


12 Comments
terrific idea – I love making bags so I’m with you all the way! This one would be a good one for my kids a t school to make! I’ll link it in my blog! Thanks!
http://yellowfibro.blogspot.com.au/
I love this pattern and the whole idea of a sew along! Hope I can make some! I will link this in my blog for others, and share it with my students at school. Thanks.
http://yellowfibro.blogspot.com.au/
Thanks Tracy! I just visited your website and it’s so cool! I love how you used all the images from each blog post as a photo collage on the front page. Is that a default blogspot template? Do you teach in an art school? Very colorful and inspiring!
hi hi!
so may i clarify- quilting cotton is considered medium weight cotton?
– and the pattern already include the 1cm seam allowance? but there is a double line drawn around the body, is that seam allowance or something else?
thank u!
bk
Yes. I’m not sure if I’m entirely accurate about the terminology of fabric weights but I refer to lightweight as fabrics such as gauze, voile, lawn etc as lightweight cotton. Quilting cotton fabric is usually heavier than that, so I refer to that as medium weight, because there are thicker and heavier ones such as canvas, twill, drill etc.
The pattern already includes the allowance so that you can just place on your fabric and cut out the cloth. The line drawn is to indicate the seam allowance so that when you sew, you know that you should sew 1cm from the edge. But I think in the future I will indicate all the seam allowance because it is not always standardized at 1cm.
Thanks for the feedback! 🙂
Can’t wait to work on this more tomorrow. Found some denim and some upholstery-weight ticking in red in my stash. Gonna have to make a second one from some super-cute designer canvas I’ve been hoarding.
That label is amazing! Your blog is so cute!
Hi I just found your blog through a link on tanoshii-schneidern.blogspot.de and I love the idea of the bag sew along. I think I will try to complete one as well!
[…] inspirasi dari sini, suka pake banget sama karya2 craft […]
[…] One more thing. For this project I used the above (which is not quite heavy duty canvas but thicker than normal cotton), as well as an upholstery fabric (which is thick and has some body) for the lining. That’s why I did not use any interfacing. If you have made bags before, you will realize that interfacing is necessary to provide structure to a bag. So I leave it up to you, depending on your fabric choices, whether or not to apply interfacing. For a step by step on how interfacing is applied, you can refer to my previous sew along of the granny bag. […]
sorry to comment on such as old post but just found your blog and got some fabrics out to try this tutorial! the bag is adorable and your diagrams look so clear even for a novice like me to follow 🙂 wondering why the handles are cut on the bias? would it not stretch out? what happens if u cut along the grain instead ?
The handles are cut on the bias because it needs to go over the curves. Fabric cut on the bias will be more “stretchable” and can be sewn down better without creases, as opposed to fabric cut along the grain.