Now, let’s get started! This is what we are going to be doing today. The sewing was mainly documented in video form and I did not have enough time to take screenshots so most of the sewing process will be in the form of a video tutorial.
How to make
1. Cut out fabric.
2. Preparation work – iron on interfacing for collar lining, serge edges
3. Sew shoulder seams, open seam allowances flat (sewing video)
4. Attaching the collar pieces (sewing video)
5. Finish raw edges of bodice+ collar, armholes, hemlines with bias (sewing video)
1. Cut out pieces on fabric
As mentioned yesterday, it will be a good idea to make the first piece in a cheap fabric, just to test for fit and make any adjustments.
Following the directions on each pattern piece, layout the patterns on your fabric, and transfer the outlines using chalk/fabric markers.
These are the pieces you should have after cutting out the fabric. I have used different color fabrics for all the pieces in this tutorial, so that while I am taking close up pictures, you can still identify the individual parts of the dress without getting confused.


Do take note for the orientation of the two front pieces. If you cut the front piece by placing the pattern piece on the wrong side of the fabric, the curved edge will be on the left side of the dress. (from front centre down to left side seam). If you do that, make sure you do the same for the front inner flap, i.e. to trace and cut out on the wrong side of the fabric, and you will get two pieces that match each other.
If you wish the curve to be on the right side of the dress (running from centre front to right side seam), then mark on the right side of the fabric. Do the same for the front inner flap. This was how I cut my fabric. I placed my pattern pieces on the right side of the fabric and this is the orientation of my pieces (right side up)
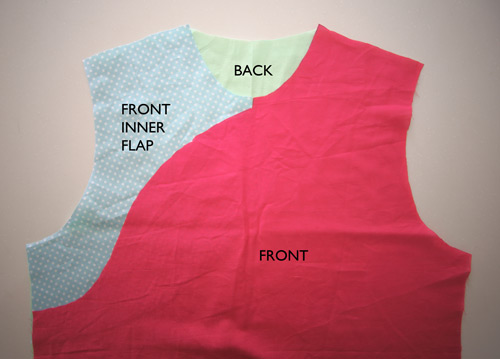
You are seeing it on the monitor and hence it is a mirror image. Imagine if you turn the dress around and put it on, and you will see that the front curve runs from the centre front down to the right side seam.
2. Preparation work
– apply fusible interfacing on collar lining piece.

– serge shoulder seam and side seams (see diagram below for edges to serge

For steps 3-5, please watch the video below. As mentioned earlier, I did not have time to extract the screenshots for a step by step photographs tutorial. So I hope it’s not a problem viewing on youtube for most of you. I do find video tutorials more useful and less words are needed for explaining the process, so I hope you will enjoy them too.
Tomorrow we will finish up with the side zip opening, side seams, and the decorative buttons down the main bodice curved opening. Before we move on to that, it will be a good idea to test the fit on your little girl (if it’s not meant to be a surprise :P). You can make some adjustments to the armholes/waist/length if you prefer the dress to be more fitting. I will leave it to your discretion.
See you back here tomorrow for Day 3 of the sew along!


5 Comments
lovely tutorial 😀 Im doing a quibao for myself and this one help a lot. Thank you very much <3
[…] What we did yesterday… 1. Cut out fabric. 2. Preparation work – iron on interfacing for collar lining, serge edges 3. Sew shoulder seams, open seam allowances flat (sewing video) 4. Attaching the collar pieces (sewing video) 5. Finish raw edges of bodice+ collar, armholes, hemlines with bias (sewing video) […]
[…] 1 ( 14 Jan, Tuesday)- Download PDF patterns, assembly of PDF patterns and Preparation of Materials. Day 2 ( 15 Jan, Wednesday) – Sewing Part 1 Day 3 ( 16 Jan, Thursday) – Sewing Part […]
Thank you! I love that you’ve used different colours to highlight what each piece is – very appreciated 😉
[…] Click here for Sew-Along Day 2 […]