Welcome to Sew Along Day 1 of the Girls Qi Pao (Chinese Dress). Today we will download and assemble the pattern and get our materials ready.
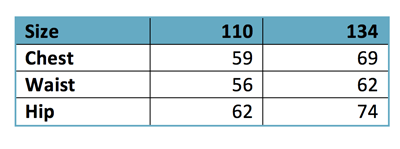
1. First, please choose your size and download the corresponding PDF file.

Please download from my PDF pattern shop – PorcupinePatterns.com. both sizes are included in a single file.
If you need other sizes, there is a paid version available for sizes 2-12 on my store as well. The paid version has both A-line and Straight styles, with sleeveless, short sleeve and cap sleeve options. Click here for to view the details.
2. Print the patterns on A4 paper, remember to set your paper size on your printer settings to A4.
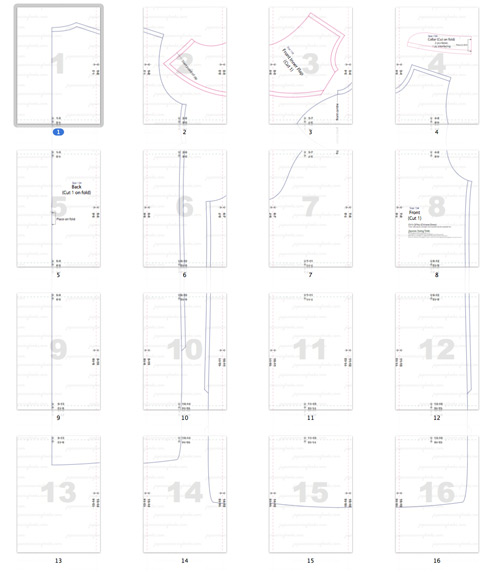
3. Layout the printed pieces based on the layout diagrams below.
Size 110
Assembly layout as below (click on image to zoom in)
Size 134
Assembly layout as below (click on image to zoom in)
4. Align the printed sheets
Match corresponding page numbers and align the arrows so that the vertical and horizontal dotted lines meet up (see diagram below)

5. Tape or glue the pieces together.
What I usually do is to cut along the pink dotted line on the left piece (page 6 in the example above), apply glue to the left of the pink dotted line on right piece (page 7 in example above), and stick page 6 over page 7, aligning the arrows and dotted lines. But it is up to you how you want to assemble the pieces. If you need more help with this let me know.
6. Cut out the pattern pieces
All the pattern pieces already include seam allowances, so once you have assembled the PDF pattern, cut out the pattern pieces.
You should have the following pieces.
1 x Front
1 x Back
1 x Front inner flap
1 x Collar

Now that we have all the pattern pieces, let’s get our materials ready
Materials
(in order of sizes 110 /134)
1. Outer Fabric (based on 90cm wide fabric – 1.3m / 1.5m
I will be using brocade for the actual dress, which is 90cm wide, so these quantities are based on a 90cm wide fabric
optional – If you want to make the collar lining in a contrasting fabric, you just need a piece of 35cm x 10cm piece of co-ordinating fabric
2. Fusible Interfacing 35 x 10cm
3. Bias tape – can be ready made or self-made.
I am using single fold bias tape in my tutorial which is 12mm (approx. 1/2″) wide – 2.7m/3.2m
If you are making your own using co-ordinating fabric, cut the fabric cross grain 24mm or 1″ wide. The final width of the binding will be 6mm or 1/4″ respectively.
4. Frog buttons / Chinese knot buttons
You should be able to get these easily online or hopefully even in your local sewing stores. If not you can always make your own! There are a variety of different knot buttons, some are really simple to make and there are couple of tutorials online that you can follow to make your own.
5. Sew on metal snap buttons 7mm – 3 sets
6. Concealed Zip – 20cm(8″) / 25cm(10″)
Getting the patterns ready was tedious work! If you spot any mistakes, be sure to let me know. 🙂
Tomorrow, we will start sewing!
Click here for Sew-Along Day 2


31 Comments
[…] Day 1 ( 14 Jan, Tuesday)- Download PDF patterns, assembly of PDF patterns and Preparation of Materia… Day 2 ( 15 Jan, Wednesday) – Sewing Day #1 Day 3 ( 16 Jan, Thursday) – Sewing Day #2 Day 4 ( 17 Jan, Friday)- Sewing Day #3 (schedule may shorten to two days if I am able to get the pictures done in time, I will update this page accordingly) […]
This pattern looks great!
I wish I had time right now to sew along…
Thank you so mouch for this wonderful sewalong!
I just put together a size 98 and it seems perfect. Well done putting it all together – looking forward to cutting and sewing!
Hi there,
Thank you so much for putting all these together! I am so excited to be making a traditional dress like this. It is so generous of you to be making these patterns free for us too!
I saw on the pattern that we will be using a zip at the side of the dress. If this is correct, would you be able to tell us how long the zip should be in the materials list?
Cheers,
Cindy
Hi Cindy, yes you spotted my mistake! 🙂 I did leave it out, but I have added it to the list. Thanks for letting me know 🙂
Hi hi! I saw your qipao first on your cottoncandy blog but didn’t know you were the contributor to the post. Thank you for generously sharing such a pretty dress pattern! 🙂
Hi! Thanks for the pattern, am looking forward to making the qipao. I have printed out the pattern for size 122, but it looks rather tight. The front pattern piece measures 33cm across excluding seam allowance, which does not seem sufficient for 68cm hip?
Hi Sharon, The hip for 122 size is actually 43.7cm down from the back neck point, so if you measure from that point, the width is 34.3 on the front and 17.2 on the back (minus seam allowances). The back piece should be multiplied by 2 since it is cut on fold, so the total is 68.7. It is quite fitting since the qipao is not meant to be a loose dress, but as every one’s shape is slightly different, you can adjust the hip width at this point (43.7cm down from back neck point) to fit, if it is not wide enough.
Thank you for the reply! It does look quite tight fitting so I modified the pattern to an slight A-lined bottom. Your video instructions are really clear and easy to follow even for a beginner like me.
Just found this – was looking for something like that for a long time! Thank you so much for doing all that work and for sharing it!
Thanks for the wonderful tutorial. I’ve printed out the pattern of size 98 and cut the fabric. But it seems that there should be seam allowance at neck for the back pattern. Or the back and front pieces would not match at shoulder. The same mistake seems to appear at size 110, too.
Hi there thanks for sharing this pattern free to us! I was looking for the cutting out my own but then decided to jump online and check some out and I found yours its great generosity for you to share this qipao with us… thank you
xxoo
Hi there!
I want to sew a dress like this for mondocon because i want to be Kagura But i dont find a pattern in my size (Im about 174 cm) when you know a page or something could you help me?
Thanks
Hi Ilona, Try this one, it’s for adults http://m-sewing.com/patterns-catalog/women/dresses/asian-dress.html
Thank you
Hi,
Love this pattern and I’ve made the modified version with a circle skirt and another one with a gathered skirt. Thanks for sharing!
Many friends have been asking me to make one for their daughters. Is it ok if I sell this on a small scale?
Esther
Hi Esther, sure! If it’s just for your own circle of friends, no problem. If you are selling on an online store like Etsy, it will be great if you can just attribute the pattern source to my blog. Thanks! 🙂
Hi,
I’m a beginner in sewing and I’m so glad I found your website. My girl’s size is in between size 122 and 134, so 134 should be a safer choice right? May I know how much is the seam allowance? 1.5cm?
Do you have any tang zhuang sewing pattern for boy? I have been searching all over and can’t find any.
Thanks!
Hi Sharon, the seam allowance is 1cm. No I don’t have any tang zhuang patterns. I will need to draft some soon for my boy. If I have time I will post it on the blog. 🙂
Hi,
I want to sew this qipao for my daughter (7 months old). Do you have the pattern size 86 or 90 maybe? thanks
Regards,
Yuanita
I am confused… am I supposed to cut the paper pattern along the red dashes before I put it together? it seems that is only way the pieces fit properly… I am concerned that I may make it to small because the pattern piece lines sometimes go over the red dashes. into what looks like margins
.
Hi Audrey, The red dashes are supposed to meet. So for two adjoining pieces, if you are using tape, you cut along the red dashes and put your tape over both pieces where the lines meet up. If you are using glue, you just have to cut one side along the red dashes, and then lay this cut piece over the adjoining piece and glue down. The pattern lines extend over the red dashes because the program uses overlapping artboards and splits it up into multiple sheets of paper, but the pattern lines actually meet up where the red dashed lines are.
Thanks for answering. My granddaughter is a little bit bigger along her bottom. Where can I add some room in the pattern?
Eu fiz pra minha filha ,tomei a liberdade de acrescenta mangas,ficou lindo .
Is it possible to add more sizes? I would like to make one for my 18-inch doll… Maybe consider what to add for the template. Thank you sooooo much!!!
Hi! I’m so excited to try this! Thank you so much for your wonderful tutorial. Please don’t get tired of doing more tutorials. Thank you. God bless you..
Thank you so much for this pattern. I hope I can get to it soon and let you see how it turned out.
Thanks so much.
hi! i saw you posted a qi pao with cap sleeves,it looks so nice!
may i know how to draw the pattern for the sleeves?
thanks a lot
Hi Kathy, I actually drafted it by hand and had to make multiple amendments before it will sit well. I am planning to release some sleeves for the next release so I am in the testing phase right now. Do look out for it!