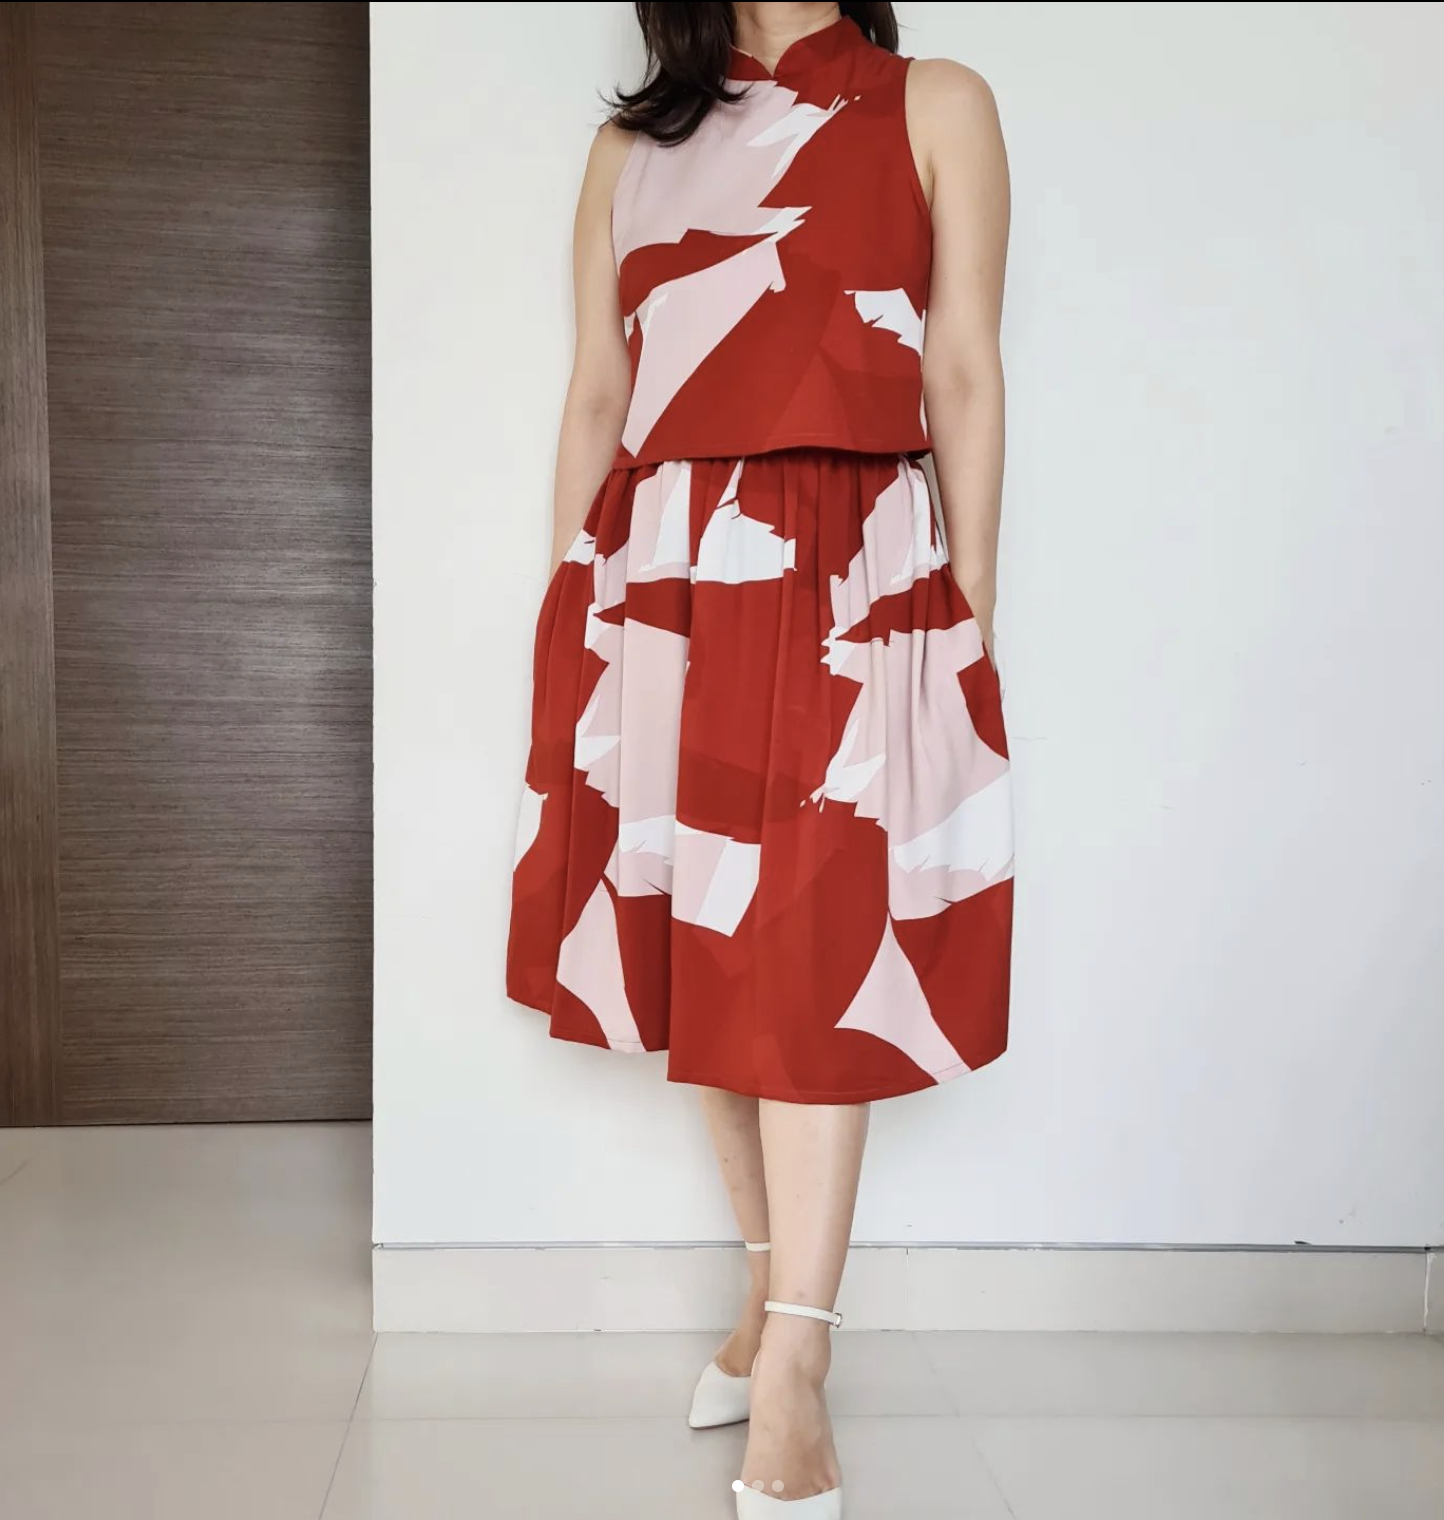
For this year, in the spirit of reducing my cluttered wardrobe with pieces that can only be worn once, I’ve decided make a more versatile and multitasking outfit, by using the same pattern, but hacked into a 2pc set. I’ll wear them both together as a two piece set on the first day of the lunar new year, and I can easily mix and match the top with jeans and the skirt with a plain tee for another day.

Changes at a glance.
Top : I reduced the collars height by 1cm for a more casual look. Made the front piece by cutting on fold from centre front. I wanted it cropped, so I only added 2cm to the waistline mark. Sewed the bust darts but omitted the waist darts for a more boxy look. Created a neck facing piece and inserted a long slit opening on the back, closed with a loop and button. More details down below!
Skirt : I had only 2m of this Mind the maker fabric bought from Sew Good Knits , so the most effective skirt I could make was a gathered skirt with a flat waistband + elastic back for easy feasting. I actually wanted to make culottes but there wasn’t enough fabric. You could follow any skirt pattern you want. I actually used the Simple Skirt from the nani IRO sewing book as a base but I made some changes to the height of the waistband.
Now for the detailed changes to the pattern pieces you will need to recreate the crop top. The pattern pieces are based off the Multisize Ladies Qipao and I will note down where each piece is taken from.
Note that some of the illustrations below were borrowed from my other patterns such as the Qipao Jumpsuit so please read the text carefully before cutting into your fabric!
- COLLAR PIECE
Adjustments to collar piece (taken off sheet G – Lined version)
 Cut out 2 mirrored pairs of collars, one set outer collar (main fabric) and one set of inner collars (could be main fabric or contrast/coordinating fabric, the choice is yours)
Now sew the collars together, right sides facing. Clip curves and trim seam allowance. 
Turn collars right side out and give it a good press. Understitch the inner collars, or you can also do a decorative top stitch from the right side if you want. All up to you.
2. FRONT BODICE
Adjustments to sleeveless tight front bodice on sheet B (only need pattern up to waist line)

Armhole finishing is optional. Original pattern has no seam allowance because we used decorative bias binding. But in the hacked top I made, I used a clean finish binding (see last pic below for what I mean by that)

Next, we need a front facing piece.


3. BACK BODICE
Adjustments to sleeveless tight back bodice (up to waist line only) on sheet C

Back facing piece – this is a little trickier because I will be using a slit opening with a loop and button closure. This is to allow my head to get in and out of the neckline area.


4. PREPARING FACING PIECES.
After making the facing pattern pieces, cut one on fold for each (front and back) on main fabric and interfacing. Apply interfacing, overlock shoulder seams (I think I left this out on the diagram for the front facing) and all around the curves. Mark sewing line on back bodice as shown.
5. MAKE BUTTON LOOP
The following diagram shows you how I make a long piece (borrowed from instructions of Qipao jumpsuit which needed multiple button loops) For this hack you only need one 5cm piece. Cut a strip 2cm x 8cm long. After making the loop trim off the excess to a final length of 5cm. Trust me you will need it.
6. Baste button loop to right side of back bodice (ignore the red dash line for now)
7. Sew front and back bodices together, right sides facing.
8. Baste collars to bodice (starting from front centre)
9. Sew front and back facings together, right sides facing.
10. Align facing pieces around neckline of bodice pieces, pin and sew all around the neckline, make sure all the shoulder seams are open. Clip curves.
11. Sew along red dashed line (essentially 0.5cm from back centre line) around the end of the opening, and up the other side. Cut along the centre back line, stopping at the end of the slit opening, then carefully clip around the curved base.

12. Flip the facings around and give it a good press. Understitch the facing to the collars, top stitch 0.3cm around the slit opening, sew a button on the opposite side corresponding to the button loop.
13. Finish armholes with a clean finish. The measurements below are based on the Qipao jumpsuit pattern, but for the hack I used a 0.7cm seam allowance and a 2.5cm piece of bias of around 55cm for each armhole (you have to measure the armholes front and back to estimate how long a piece you will need) You can also search up clean finish binding on Youtube if you are unfamiliar with the method. This was covered in the sewing tutorial for the jumpsuit pattern as well.


No Comments