Browsing Category

Free Patterns

All free patterns including the Japanese pattern links as well as my own downloads

Free Patterns Guides Ladies Sewing Patterns Porcupine Patterns Sewing Tutorials

Hacking the Ladies Qipao to a 2 piece set

January 3, 2023
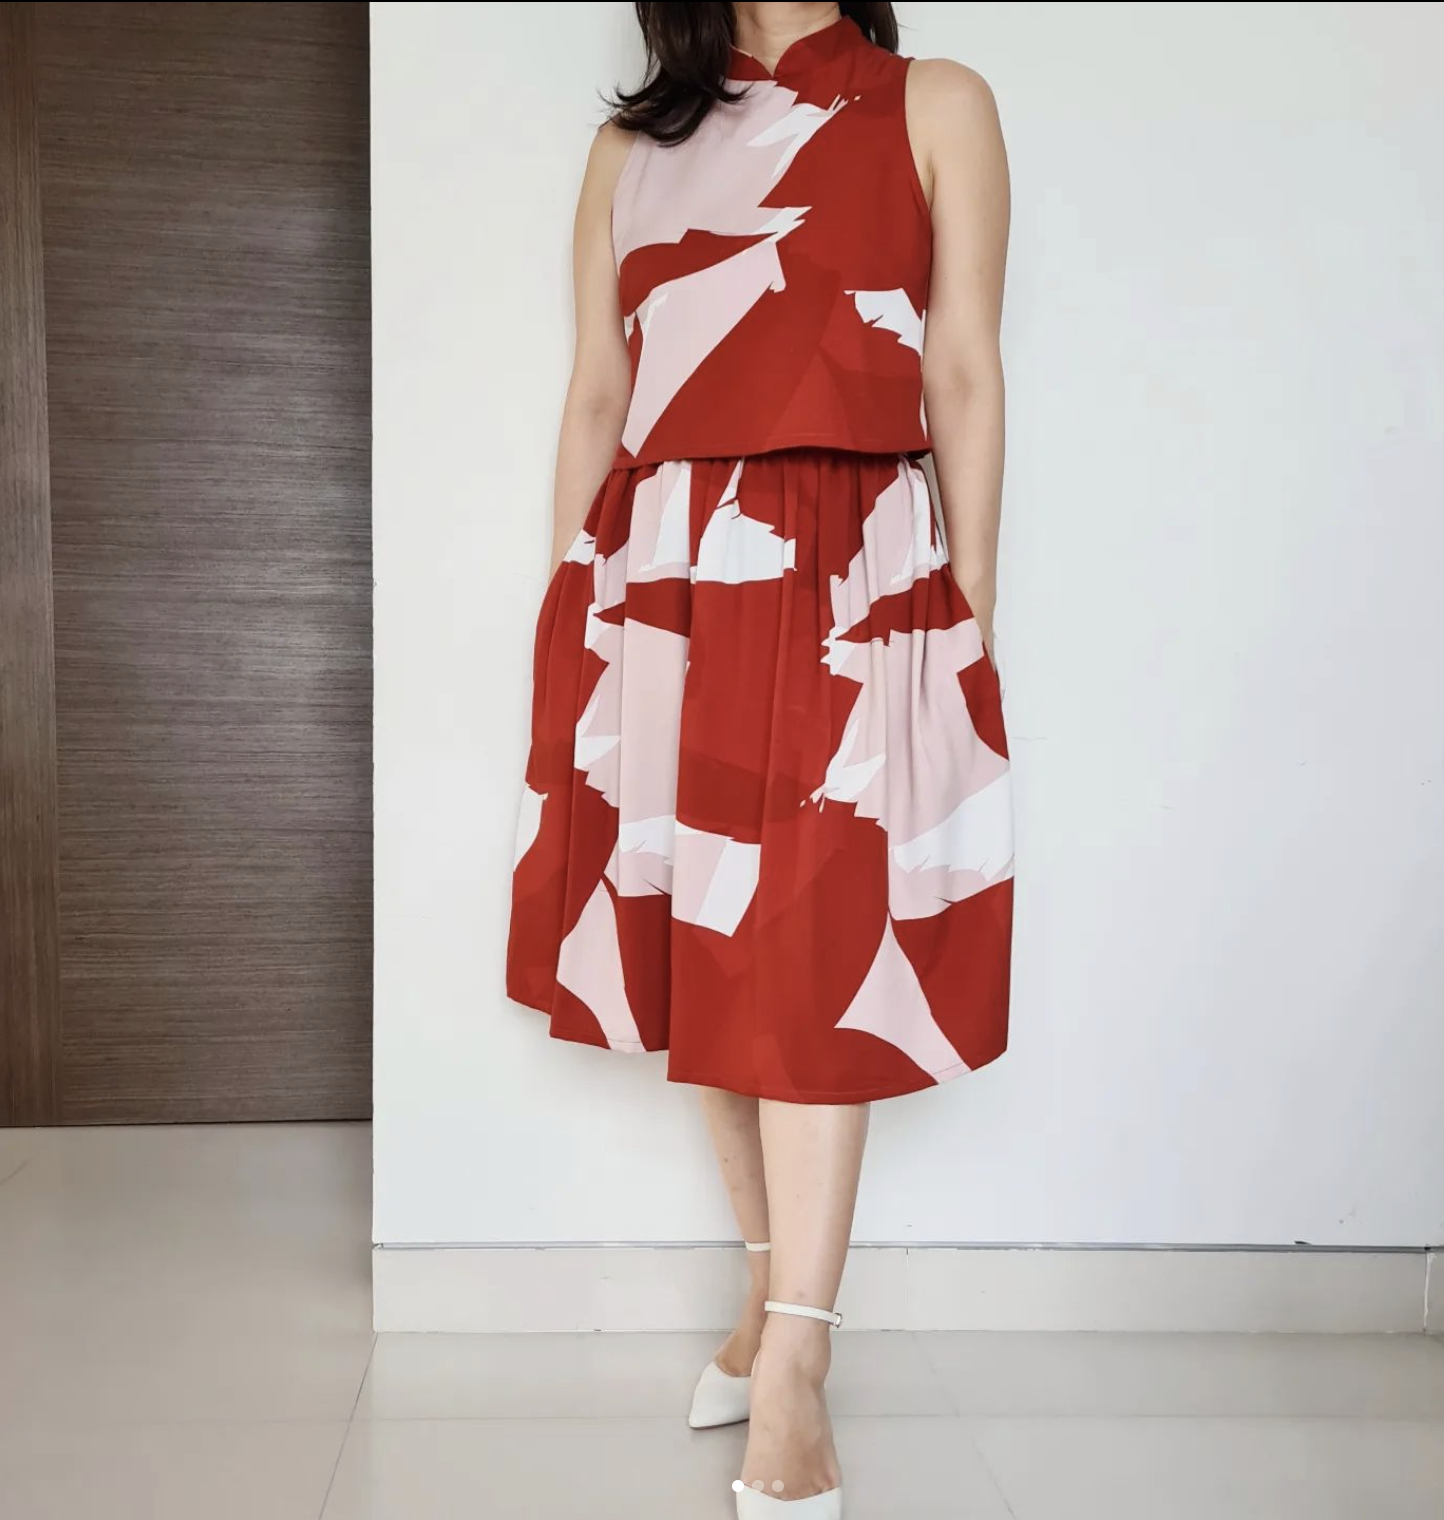
For this year, in the spirit of reducing my cluttered wardrobe with pieces that can only be worn once, I’ve decided make a more versatile and multitasking outfit, by using the same pattern, but hacked into a 2pc set. I’ll wear them both together as a two piece set on the first day of the lunar new year, and I can easily mix and match the top with jeans and the skirt with a plain tee for another day.

Changes at a glance.

Top : I reduced the collars height by 1cm for a more casual look. Made the front piece by cutting on fold from centre front. I wanted it cropped, so I only added 2cm to the waistline mark. Sewed the bust darts but omitted the waist darts for a more boxy look. Created a neck facing piece and inserted a long slit opening on the back, closed with a loop and button. More details down below!

Skirt : I had only 2m of this Mind the maker fabric bought from Sew Good Knits , so the most effective skirt I could make was a gathered skirt with a flat waistband + elastic back for easy feasting. I actually wanted to make culottes but there wasn’t enough fabric. You could follow any skirt pattern you want. I actually used the Simple Skirt from the nani IRO sewing book as a base but I made some changes to the height of the waistband.


Now for the detailed changes to the pattern pieces you will need to recreate the crop top. The pattern pieces are based off the Multisize Ladies Qipao and I will note down where each piece is taken from.

Note that some of the illustrations below were borrowed from my other patterns such as the Qipao Jumpsuit so please read the text carefully before cutting into your fabric!


  1.   COLLAR PIECE
    Adjustments to collar piece (taken off sheet G  – Lined version)

Cut out 2 mirrored pairs of collars, one set outer collar (main fabric) and one set of inner collars (could be main fabric or contrast/coordinating fabric, the choice is yours)

Now sew the collars together, right sides facing. Clip curves and trim seam allowance.

Turn collars right side out and give it a good press. Understitch the inner collars, or you can also do a decorative top stitch from the right side if you want. All up to you.


2. FRONT BODICE
Adjustments to sleeveless tight front bodice on sheet B (only need pattern up to waist line)

Armhole finishing is optional. Original pattern has no seam allowance because we used decorative bias binding. But in the hacked top I made, I used a clean finish binding (see last pic below for what I mean by that)

Next, we need a front facing piece.


3. BACK BODICE
Adjustments to sleeveless tight back bodice (up to waist line only) on sheet C

Back facing piece – this is a little trickier because I will be using a slit opening with a loop and button closure. This is to allow my head to get in and out of the neckline area.

4. PREPARING FACING PIECES.
After making the facing pattern pieces, cut one on fold for each (front and back) on main fabric and interfacing. Apply interfacing, overlock shoulder seams (I think I left this out on the diagram for the front facing) and all around the curves. Mark sewing line on back bodice as shown.

5. MAKE BUTTON LOOP
The following diagram shows you how I make a long piece (borrowed from instructions of Qipao jumpsuit which needed multiple button loops) For this hack you only need one 5cm piece. Cut a strip 2cm x 8cm long. After making the loop trim off the excess to a final length of 5cm. Trust me you will need it.

6. Baste button loop to right side of back bodice (ignore the red dash line for now)

7. Sew front and back bodices together, right sides facing.

8. Baste collars to bodice (starting from front centre)

9. Sew front and back facings together, right sides facing.

10. Align facing pieces around neckline of bodice pieces, pin and sew all around the neckline, make sure all the shoulder seams are open. Clip curves.

11. Sew along red dashed line (essentially 0.5cm from back centre line) around the end of the opening, and up the other side. Cut along the centre back line, stopping at the end of the slit opening, then carefully clip around the curved base.

12. Flip the facings around and give it a good press. Understitch the facing to the collars, top stitch 0.3cm around the slit opening, sew a button on the opposite side corresponding to the button loop.

13. Finish armholes with a clean finish. The measurements below are based on the Qipao jumpsuit pattern, but for the hack I used a 0.7cm seam allowance and a 2.5cm piece of bias of around 55cm for each armhole (you have to measure the armholes front and back to estimate how long a piece you will need)  You can also search up clean finish binding on Youtube if you are unfamiliar with the method. This was covered in the sewing tutorial for the jumpsuit pattern as well.

Free Patterns Sewing Tutorials Sewing Videos

Free Sewing Pattern and Tutorial – Surgical Mask Case Patterns

July 7, 2020

As promised, here is the sewing video and pattern for the Surgical Mask Case Pattern. This is a very simple surgical mask holder pattern inspired by the many pretty ones I’ve seen on IG. I keep this in my bag and it provides a quick stowaway for my mask when I need to take it off for a meal.

Link to PDF pattern

Free Surgical Mask Case / Mask Holder Pattern
(1 sheet of A4/letter paper required)

All seam allowances are included, refer to the video for seam allowances. Remember to print at 100%/Do not scale, and to check  your test square after printing!

I have included the stitch line on the template so if you need some visual guidance to sew neatly, you can transfer this marking using carbon paper and a tracing wheel and sew following the line rather than referring to the seam allowance (because that will depend on how precise your fabric cutting is).

Other Patterns

There is another 3D Mask Case Pattern, designed for the free 3D Face Mask Pattern. Click on the links if that’s what you are looking for instead!

Do tag #JSBMaskCase on social media if you make this so we can all see your beautiful works! In the meantime, Mask up and stay safe!

Free Patterns Sewing Tutorials Sewing Videos

Free Sewing Pattern and Tutorial – Mask Case for 3D Face Mask

July 7, 2020

Thanks for all the lovely feedback for the 3D face mask! I’m glad many of you have tried it and actually took time to send me personal messages about how comfortable it fit for you. I’m so glad that it helped! It has been at least 6 months since the first case was detected here in Singapore and it shows no signs of going away.

Now on to the mask case pattern designed for these masks. Short story this time 😛 So the reason why I had to make this case is because in Singapore we are now allowed to dine out in small groups of 5. Our first visit to our favourite Japanese restaurant and when we took off our masks to eat, we had a erm… where should I put down this mask that I will be wearing again later. Certainly not on the table? In my pocket? In the bag? Well, you get the point. This is a one mask storage case for a quick temporary storage.

Pattern download here

Free 3D Mask Case Pattern

The pattern is made up of 3 pieces of A4/Letter size paper joined together. Please check that the printing is set to 100% / Do not scale before printing. Check the size of the test square (on pg1) after you have printed the files.

Do tag #JSBMaskCase on social media if you make this so we can all see your beautiful works! In the meantime, Mask up and stay safe!

The surgical mask case pattern will be released soon. Check back on the blog later!

Free Patterns

Free Mask Pattern Download – Contoured 3D Face Mask

June 20, 2020

After testing out many different mask shapes and materials, I’ve finally found the best shape and fabric combination. I will elaborate further on how I decided on this but as I personally hate wading through long grandmother stories before getting to the pattern, I will post up the video and Free Mask Pattern Download links here first before getting to the details. How does that sound?

Free 3D Contoured Face Mask Pattern Download Links

All patterns include a test square (please check!), and all seam allowances are included. Please follow the video for the seam allowances for different parts of the mask.
If you make a mask using my pattern, please tag #JSBfacemask so I can see it!

Free 3D Contoured Face Mask Pattern All sizes – This is a layered PDF pattern which allows you to select the sizes you want using Acrobat Reader (Free software)

If you prefer to download separate sizes here are the links

XS – Fits preschooler approx 2-4yrs old

S – Fits preschooler approx 4-6yrs old

M – Fits Primary school student 7-12yrs old

L – Fits Teens/Ladies

XL – Average Men’s size

XXL – Fits Men with larger faces

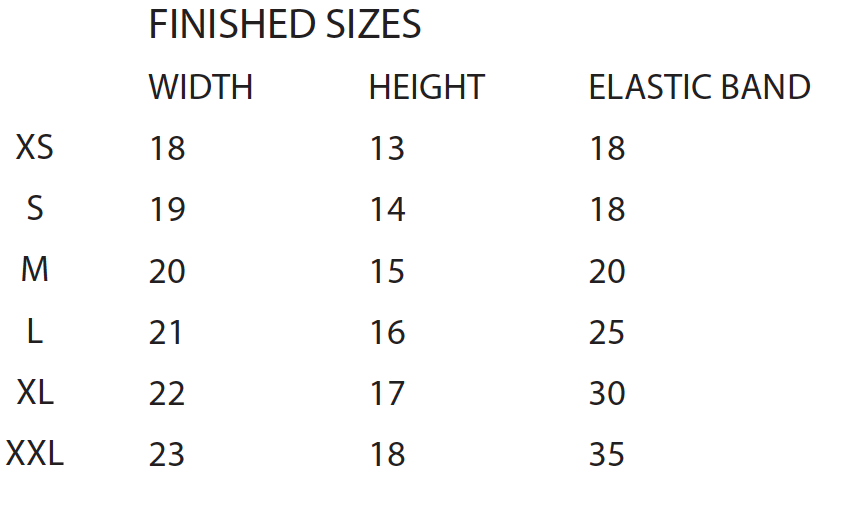
The above description are based on average sizes so I think for clarity here’s the finished measurements for the face mask. On the right column you will see the approximate length of elastic band to cut for the different sizes.

Depending on the size you choose and the face size of the wearer, you may need to trial and error and make some adjustments.

Recommended fabrics

  • Outer layer – A medium weight cotton such as quilting cotton, oxford, Japanese soft canvas, nothing too soft as there are no gaps around the mask and if you fabric is too soft.  it will stick to your face as you breathe in and out as I discovered when I tried this pattern with 2 layers of Liberty Lawn.
  • Lining Layer – I used quilting cotton, or you can use a thinner tightly woven cotton such as Liberty Tana Lawn (very cool and comfortable).

Ok now for the grandmother story of how this pattern came about. I know I’m really late to the mask tutorial game on youtube, some have been sewing since February. To be honest there wasn’t a real shortage of masks in Singapore especially due to the initial recommendations by the Govt not to wear them unless you are sick. I think that was a big mistake because the community spread worsened and we were forced to go into a circuit breaker. It was only sometime in April that they made it mandatory for everyone to wear a mask.

Sometime during then I started making masks for donation. This is an ongoing a nationwide effort appealing to home-sewists to help make masks for a wide range of beneficiaries. Then it was announced that it is now compulsory for everyone to wear a mask when leaving the house, or risk a fine. That was when I started making some of the standard cup shaped masks for myself, as I was getting an allergic skin reaction from wearing surgical masks especially when it gets hot and I start perspiring. It is really uncomfortable and the breakout takes a few days to settle with steroids.

With the cup shaped masks it was better, but I found it very uncomfortable to wear for long periods because the fabric gets stuck to my face when I breathe in and out and sometimes it feels like I can’t breathe at all. The other problem was that if you had to talk, the cup will slide off as you talk. So I started trying out other designs, and finally saw this contoured design on a Spanish Instagrammer –  ateliermaryribeiro She makes the coolest and most fashionable face masks I’ve seen, but I couldn’t find the pattern anywhere (maybe it’s there but I couldn’t find it because I can’t read the language :P)

Then I discovered this video from another youtuber Romilda Dias and this was where I learned  how to draft the pattern. But there was only one size and I wanted to make them for my kids as well, so I transferred it into my pattern drafting software, and using the measurements from store bought masks as well as my kids measurements, I came up with 6 sizes. The other difference is that in her videos she used a different way of attaching the elastic band. Her method saves more elastic, but it was not adjustable, which I found out when I sewed some too long and in order to shorten it I had to unpick the stitches to replace it. This was a problem if i had to sew for other people that are not staying with me as I won’t be able to adjust it to fit. So I sewed a casing for the elastic as well.

Why 6 sizes? Well, in Singapore kids above 2  yrs old have to wear masks the minute they leave the house. I find it quite ridiculous honestly, because it is really hard for them to keep it on or to wear it properly without touching it 62374 times a day. But the law is such and I can’t change it so I hope this will come in useful for those who need it. As for the XXL size, I have heard some feedback about the standard largest size not fitting the larger Mens faces. So I just graded it one size up hope it will work!

If you make a mask using my pattern, please tag #JSBfacemask so I can see it!

Bags or Zakka Sewing Patterns Free Patterns Sewing Tutorials Sewing Videos

Free Pattern – The Marupochi Crossbody bag!

May 24, 2019

Those of you who follow me on IG may have seen me post about these circle bags recently. I promised a tutorial so here it is! You can watch it on both my IGTV channel or Youtube channel. Here is a picture of the finished bag and I also gave it a name to make it easy to remember. Maru means round/circle in Japanese and Pochi is pouch! This started out as a pouch pattern but I added side tabs with D-rings to make it a cross body bag. The usual way of finishing a circle pouch (or as I have learned it from Japanese books) is to finish the insides with bias tape. Alternative, the lining is hand stitched on completely. My way of attaching the lining is a bit unorthodox but it makes for less hand sewing so I hope it won’t seem so outrageous to  you! 😛

If you make one and post it on social media, please tag me @japanesesewingbooks or hashtag #marupochibag so that we can all see it! Looking forward to your creations!

Continue Reading