This is part 2 of the series on Making a Ladies Qipao / Cheongsam / Chinese Dress. In the first part, I have included free pattern downloads in standard sizes S,M and L. But as I mentioned yesterday, it is hard to achieve a perfect fit unless you are lucky enough to fall within the standard size dimensions. This article should help those of you who are slightly off the standard sizes, or straddling between sizes and don’t know which to choose. This may not work so well if you have very drastically different measurements for bust/waist and hip. (for example Barbie ;P) In which case you will need a custom pattern which will accommodate a fuller bust.
Two scenarios.
No alteration of patterns
If you are only 1-2cm off for each measurement, it is still good enough as you can make adjustments to the darts to achieve perfect fit without having to alter the pattern. Pick the size which is best for your bust area and make adjustments to the waist darts. If the hips are too loose after making your toile, use a larger seam allowance till it fits you the way you want it too. That is why making a toile is important.
Altering the standard size patterns
However, if you are straddling between sizes (like me), here is a quick and dirty way of making adjustments to the pattern. I will suggest first of all, choosing the pattern based on the bust size that fits you best. This is because the upper bodice includes waist and bust darts, both of which are already positioned to shape the bust properly. It will not be as easy to modify the darts on the bodice as this requires a lot more shifting of points and it will also affect the neckline which in turn affects the collar. As I mentioned earlier in the first paragraph, this method will not work if you are say like Barbie. Super skinny (therefore small neck and shoulders) but big bustline, because the necklines and bust for larger sizes increase proportionately. So if you choose a XL bust but your neck is small, then the collar will not wrap your neck nicely.
So to repeat myself, this method works if your measurements are not more than 1 or 2 sizes apart. For example, my personal measurements fall within M and L, so I will use the M bodice size and make waist and hip adjustments accordingly. This is how I do it. We will make adjustments to the skirt pattern piece (original pattern without seam allowances) first. Lines in pink indicate new measurements and new lines. Use the original patterns on a larger piece of drafting paper to trace out the new pattern pieces.
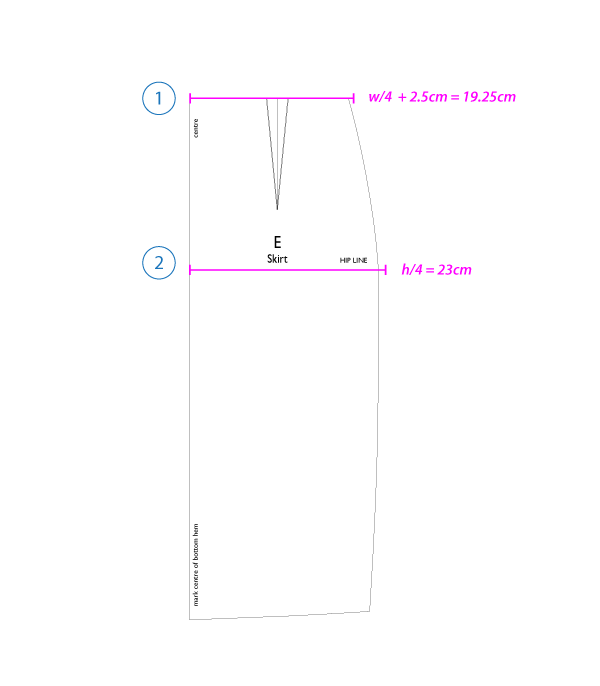
You will need the following measurements – your waist (w) and hip circumference (h). All measurements in my diagrams and calculations are in cm.
I am using Size S pattern as an example, where the original waist size is 64cm. I will change this to 67cm.
The hip size will be changed from 88cm to 92cm.
Now do your math
New waist line -> w/4 + 2.5 = 67/4 + 2.5 = 19.25cm
New hip line -> h/4 = 92/4 = 23cm
- Working on pattern piece E for the skirt only. Place your original pattern piece on a larger piece of drafting paper. From the centre line, draw a perpendicular line along the waist line, to the length of 19.25cm and mark this new point on your drafting paper.
- Do the same for the new hip line – mark at 23cm.
- From the hip line, extend a perpendicular line to the hem. You can make adjustments to the length. Just measure the desired dress length from your hips to wherever you want it to end.
- From the centre line, extend a perpendicular line towards the line you drew in step 3.
- Where lines 3 and 4 meet, draw a 1cm square inside the intersection.

 Draw a curve down joining the new waist line to the new hip line
- Draw a slight curve joining the new hip line to the top left corner of the square you drew in step 5.
- Draw a slight curve for the hem from the centre line to the top left corner of the square.
Make sure that the curves you draw for 6 and 7 flow from one point to another in a gentle curve, otherwise you will get an odd shape along the side seam.

- Now cut out the new skirt pattern and join it to the back bodice pattern. Draw a line down the armhole to the new waist line. You can draw a slight curve too that joins to the waist line.

- Now use the new skirt piece and attach it to the front bodice. Draw a new line down the armhole below the bust dart to the new waist line.
- Repeat for the other side.
Note that for the upper bodice pieces, there is only a slight amendment which is to widen the waist line. You don’t have to retrace the entire bodice on drafting paper. You can just make the adjustment on fabric if you wish.
And that’s it! Quite simple actually, let me know how it works out! Show me some pictures by hashtagging #MadeMyOwnQipao on Facebook/Instagram!
Next part of the series, I will talk about some variations and embellishment ideas for the Qipao. This will probably be up only next week as I need to get sewing too!
[…] So there is this local sewing community group of Facebook that I am a member of, and recently the same topic came up, as all the sewing enthusiasts are getting ready to start sewing for the New Year. I decided to try drafting it for my size and despite my disbelief that I would actually be able to fit into the dress while drafting it, I was pleasantly surprised that it really was not that difficult, and yes I did fit into it. I was also surprised that it actually made me look rather slim, and this debunks the theory that you need to look like a model to look good in a qipao. You just need one that fits you well. Read how to make adjustments to the free patterns here […]
I am making a muslin of the qipao and my measurements put me between M and L. However after making my first muslin size L I find that I need to add almost 2 inches to the front and back sides of the dress. Also need to add to the shoulder seams. I’ve made muslin #2 but not happy with my adjustments. I am wondering if the chart with the measurements are correct? When I measure the flat pattern pieces I find they are much smaller than my body measurements. I am not a beginning sewer. I have made several qipao dresses but your pattern is slightly different from my Folkwear pattern that I was intrigued to sew it. . Anyone else have problems in selecting pattern size? I’d really like to make this dress.