As promised, here is the updated guide to how I buy Japanese fabrics from Rakuten’s Japanese site – www.rakuten.co.jp. Why the rewrite? Firstly, at least half of the original post is no longer valid. The interface of the global Rakuten has changed such that you can’t see your last viewed items from rakuten.co.jp on the homepage (although I have discovered you can actually see your last viewed list from the search results page) In any case, even if you manage to view the Japanese product page on the global site, the English site only has a truncated version of the Japanese page and leaves out important information. So the best way is still to shop on the Japanese site. This, by the way, is not a sponsored post for either Rakuten or Tenso. Just sharing my personal shopping experience. Once you get the hang of it, you can buy almost anything, not just fabrics, from Rakuten!
There are lots of online shops selling Japanese designer fabrics like nani IRO, echino, Kokka fabrics etc. If you are looking for those it might be cheaper to purchase them from one of the many available online shops since they absorb the bulk shipping cost for you. Rakuten is my only fall back when I want to purchase fabrics that are made in Japan and are not readily available outside of Japan. For example, my recent order was for knit fabrics. The variety of knit fabrics in Japan is just mind boggling. There are jacquard knits, reversible knits, fleece knits, double layer knits, organic, bamboo, smooth knits….. the list goes on. Most of these shops on Rakuten will only ship domestic, but some will ship worldwide. I choose to use a shipping forwarder so that I can shop from all the shops without worrying if they will ship overseas. Note that there are some shops that specifically refuse to ship even to shipping forwarders.
A little about how Rakuten functions
Rakuten is essentially a giant marketplace offering goods from different stores. It is probably closer to gmarket (from korea) than amazon. So when you purchase different items from different stores, you can choose to checkout individually from each store. This also means that there are different limits that will qualify for free shipping which you have to check on each store’s shipping policy.
As I am writing this I realize that, in order to cover the entire process of how to actually shop from Rakuten, it will take more than 1 blog post. So in this post I will go through the main process of buying (assuming you already know what you want), checking out and getting it shipped to you. In Part 2 – I will show you how I search and browse for items, with keywords and shop recommendations, as well as looking out for free shipping limits, shops that ship worldwide and any other things to look out for.
Before I start, here is a quick breakdown of the costs and the timeline.
Timeline
14th September – Placed order at 9.18am
14th September – Received email from shop at 4.05pm saying that items have been shipped, tracking number provided.
15th September – Shipment arrives at Tenso’s office at 2pm
16th September – Recieved email from Tenso saying they have received my parcel. I paid for shipping on the same day.
17th September – Tenso ships out parcel
Costs
Fabric Cost
3.5m of knits – 3350yen
Shipping Costs
Domestic to Tenso = 0 (for this shop it is free for orders above 3000 yen)
International from Tenso to Singapore
Weight : 1260 g
Shipping Method : EMS
International shipping fee: 2400 yen
Handling fee : 800 yen
Insurance fee : 0 yen (insured)
Total fee : 3200 yen
Total = 3350 + 3200 = 6550 yen which is approximately SGD 78 / USD55
which works out to SGD22/m or USD15/m
So is it worth it? I know many of you now may be taken aback by the shipping cost from Tenso. But the package was quite thick, as two of the knits were wider than normal. Also, Japanese knit fabrics are hard to come by in Singapore. There are some Japanese imported knits in Spotlight, some geometric and floral prints, but these usually start at SGD16.99/m. If you ask me, the quality and prints can’t be beat, so yes it was worth it! And regards to the choice of using Tenso, I have only used another mail forwarder which is VPost Japan, a service from our local post company. They pretty much do the same thing but I feel that it is slightly slower and more expensive so I stick to Tenso and I’m pretty happy with their quick service!
Those of you who are still keen, let’s move along and start shopping!
A quick overflow of the process
1. Register for Tenso Account (or the forwarder of your choice) to get your Japanese mailing address and phone number
(Do note that you have to verify your identity the first time you use their service. Read more about this here. Apparently this is a Japanese legal requirement for all forwarding agents. If you are uncomfortable with this then I guess there will be no Panda knits for you >.< )
2. Shop for Fabric
3. Register for account with Rakuten, checkout and ship to Tenso’s warehouse in Japan.
4. Tenso will email you for payment for processing and international.
5. Once you have paid for shipping, they will ship it to you!
Register for a free account with Tenso or your mailing agent

Login and get your personalized address from. Basically all the Tenso addresses are the same (it ships to their warehouse). The only difference is your account number which is what they will use to identify your packages and mail them to you.
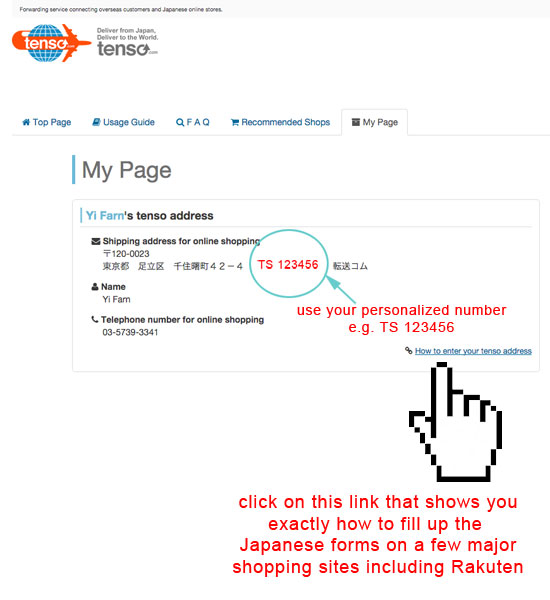
Keep this window open as you will need the information later on checkout.
Now it’s time to shop!
So let’s say I am buying the panda fabric today. Things I need to know
1. how wide the fabric is so I can decide how much to buy for my project
2. How to select the correct color
3. How to input the correct quantity
Let’s go!

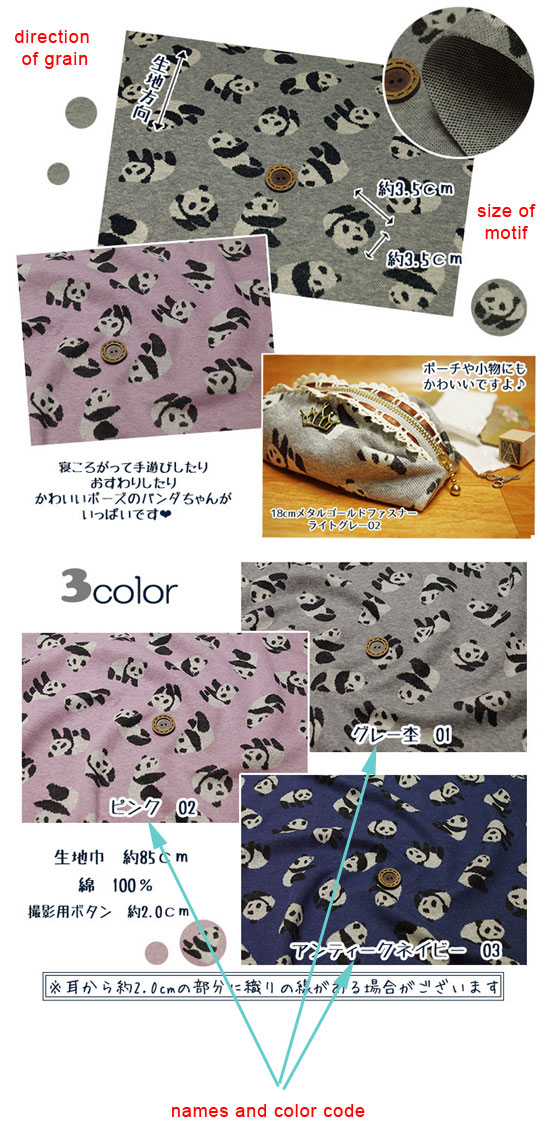
Yes the product page is super long! The first part includes pictures of the fabric, descriptive text mainly about the fabric, suggested types of projects etc. Important points to note under this section (see red text in pictures below)
 Yes I know.. the ADD TO CART button is sooo obscure, it breaks all the rules in good web designing for ecommerce.
Anyway, just for example,if I would like to buy 1.5m of the grey fabric, I should do the following.
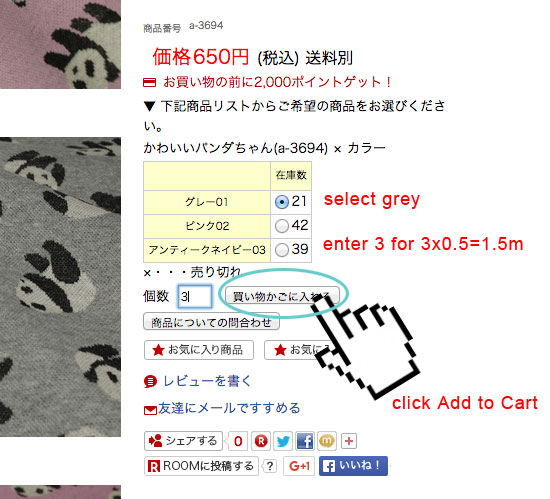
So it’s not that difficult eh? Match the color names (or use the color codes), select color, enter quantity and add to cart. The most important thing here is to note the width (巾) and the fabric units. This particular fabric is quite narrow – 85cm, while other knits can be extra wide like 140cm/175cm. As for the fabric units, I have seen some fabrics sold in 10cm units, and some 1m units. These are some of the more common ones. Just look for the “XXcm单位”.
Sometimes you may look high and low and can’t find out where to select the color and enter the quantity. Like this one

That’s because it is sold out, so the quantity box and Add to cart button doesn’t display anymore.
Or, if you see an ‘x’ for some of the color options (see below), it also means that it is sold out.
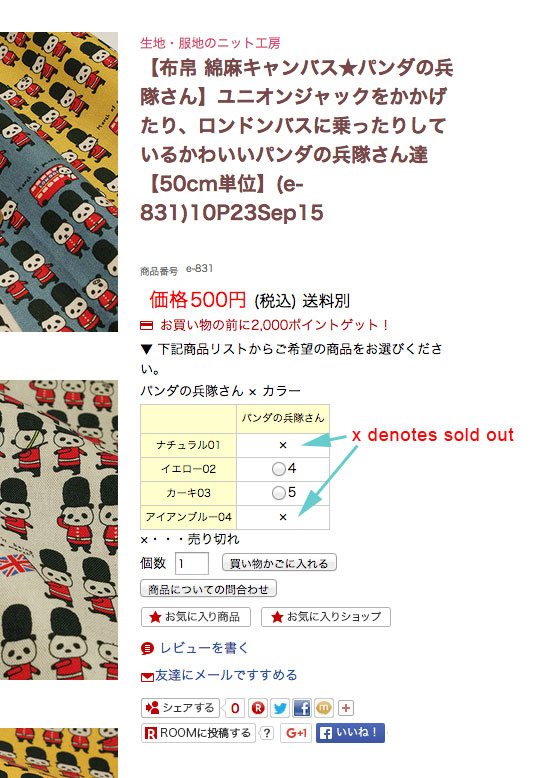
If that happens, you can select the name of the fabric and try to search again across the entire Rakuten site. This is because the same fabric can be sold in many different stores. This also means that you can do some price comparisons for the best deal.
After you click on Add to Cart, the shopping cart page looks like this. Check your color option, and quantity. If it is correct, click on the red button to checkout the shopping cart.

Once you have decided what to purchase, it is time to checkout!
After clicking the checkout button, it will bring you to this page.

I shall assume that since you are reading this guide, you have not created an account yet. So let’s focus on the second form for registration. This is where you will enter your Japanese (Tenso or other mailing agent’s) shipping address so make sure you are logged in to Tenso and have the address ready to copy over.
If your browser has a built in translator, use it! It will stop your throbbing headache immediately 🙂
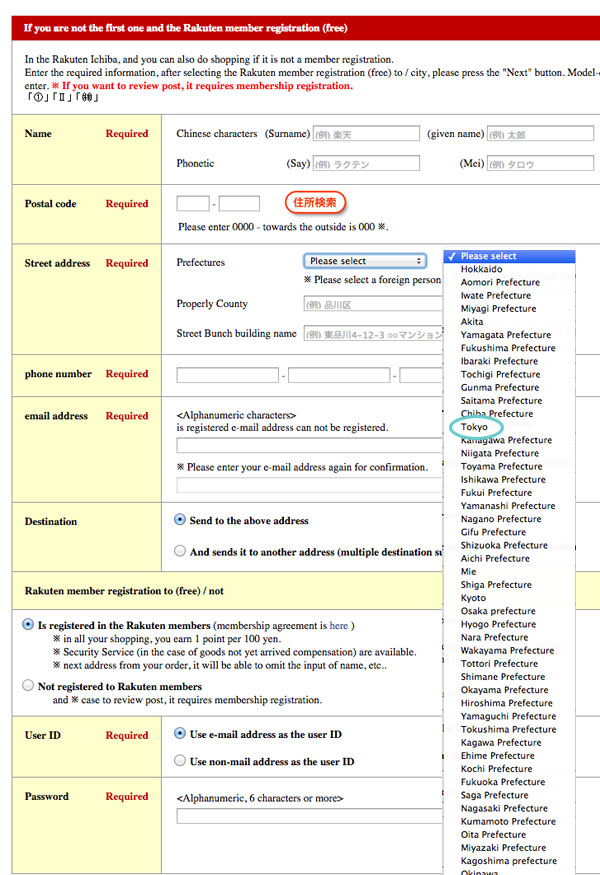
See how everything makes more sense? But if you don’t have a translator, this is how to fill it in.

Copy all the values from your own Tenso page. Note! The TSXXXXXX is your own Tenso number which you can copy from your address. You can also follow the guide from Tenso on how to fill up the Rakuten form. It’s pretty much the same thing except that they left out the bottom part of the form.
Wait, I’m stuck at the first field. What is my name in kanji???
As for the kanji name, it is a little bit tricky, you can generate it from one of the many online kanji generators but at your own risk! There are so many kanji characters with the same sounds that you can end up with a really funny name or even worse, a name with a bad meaning. If it matters to you what the characters are, you can try a site like this http://www.samuraibaby.com/kanji_names.php where they have already converted common English names to kanji, using characters with more positive meanings (although I can’t say that they all make sense). Just pick one that sounds like your name and split up the characters into the boxes. Usually there are 1-3 characters for the first name or last name. Another option is this site http://kanji-fandom.com/ where they give you a lot of characters to choose from that give the same phonetic sounds as your name, you can view the meaning of each character and choose a combination you like.
Moving on to the next page after filling up this form
You will see the following. The page is really long so I am just showing you the overview here.
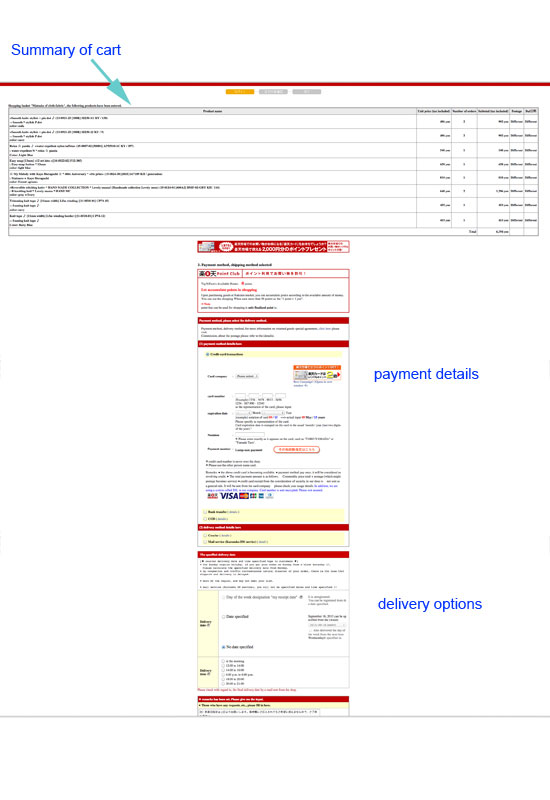
For the payment details, this is the translated form.
We can only choose credit card transaction since we can’t do Bank transfer or COD from overseas.
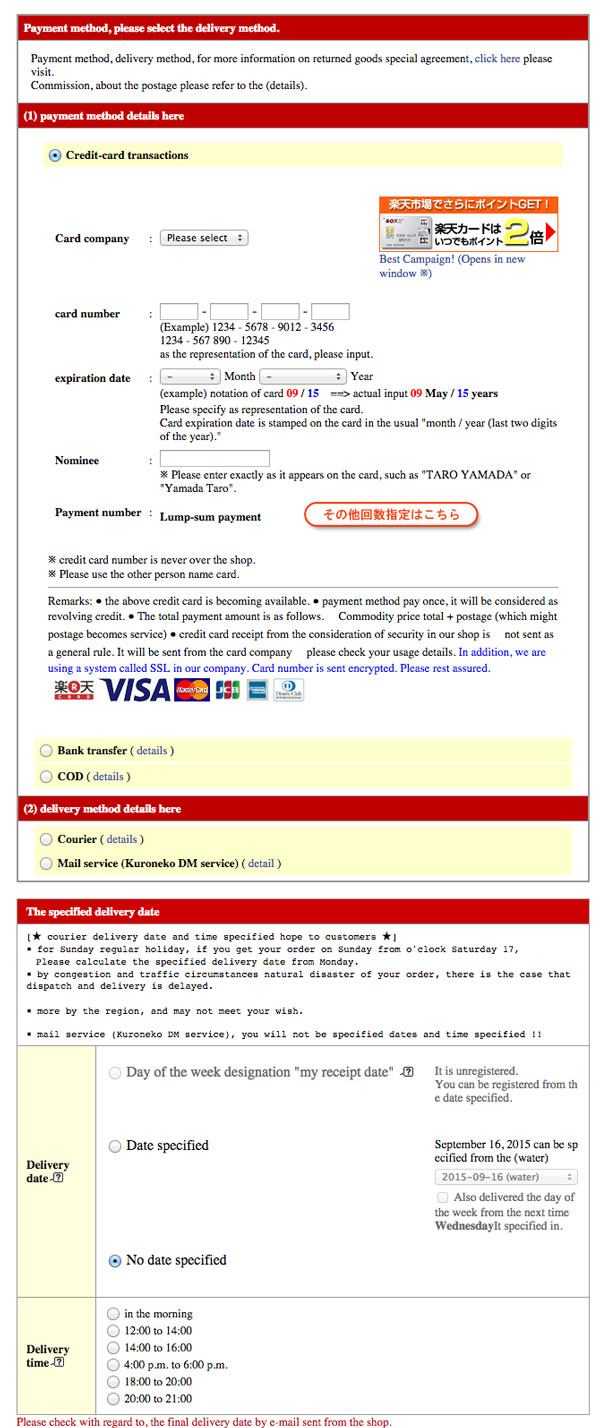
For the second part -delivery details, there are two options. Courier/Mail service. I’m not sure which is the better of the two, but I just stick to the default option ‘Courier’ (as long as it shows up as free domestic shipping in the end I’m happy). I think kuroneko is their speed delivery service? Anyway, I leave all the other options untouched, since it doesn’t matter to me which day the package gets shipped to the warehouse. Same for delivery time, I leave it untouched.
Click on the next button to move on to the next step – confirming your order

The last page summarizes everything, uncheck the options below if you don’t want to receive any emails from Rakuten. Check everything and click on the red button to submit!
All done on Rakuten, now to Tenso
Once you have submitted your order, you will receive an automatic email from Rakuten. Subsequently, you will receive the following emails.

and now you just sit back and wait for your package to arrive!
Tada!

top right photo : free gift from the fabric shop
Phew, that was a long post! Forgive me if I took longer than expected to complete! There are still lots more to say about the actual shopping so I will post up part 2 about how to actually browse and shop, and any other tips I have about shopping on Rakuten, so stay tuned! If you still have any questions about the above process, or you see something that you don’t understand, just leave me a comment below and I will answer you as soon as I can.
Click here for Part 2 of Buying Fabrics from Rakuten


 Cut out 2 mirrored pairs of collars, one set outer collar (main fabric) and one set of inner collars (could be main fabric or contrast/coordinating fabric, the choice is yours)